Wednesday, September 11, 2013

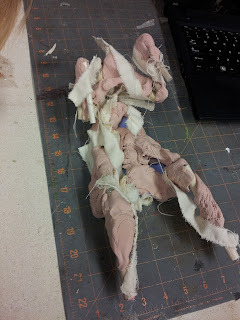
Fake Chicken Carcass

This prop was for a production of Miracle on South Division Street, at Peninsula Players Theatre in Door County, Wisconsin.
For the epilogue of the show, the characters are in the kitchen, and the script indicates that there are bits of cooking mess around to indicate the main character is in the middle of making soup. The director wanted a chicken carcass, draining in a colander, over the stock pot; as if she had just finished boiling the carcass for a homemade chicken stock.

Here is the carcass I made

And here is how I made it:
I started with a basic skeleton made from a couple pieces of lauan and dowel rods. I looked up some basic images of chicken skeletons to give me a basic guide. 


 Next I added a layer of Crayola model magic clay to give the chicken some meat and muscle. 


 Third, I soaked strips of muslin in elmers glue and wrapped them around parts of the chicken. The idea was that this would provide some different surfaces for the next, liquid latex step, to stick to. I am a little unsure of whether this step made any difference to the end product, or whether it could have skipped. 


Finally the chicken was coated with 6 coats of liquid latex (full disclosure, my intern, Ross, did this step while I was out shopping one day). 
 The latexed chicken was dusted with some Design Master, glossy wood tone spray, which, if you've read many posts on this blog, you know is the best way to give something that oven-baked look.
 Finally, I took a knife, and began to cut into the chicken, using my fingers to tear away at several of the cuts.
 Each cut exposed the layers underneath the latex skin,
 and slowly began to give them impression of a baked chicken, that had been picked clean of most of it's meat, and then boiled.

Monday, September 9, 2013

"Do their notes first"

This lesson/rule comes from Sarah Hughey, a friend and fantastic lighting designer who I have worked with on numerous productions.

The rule is simple; When you are working on a show, especially during tech, you will likely have a long list of notes you would like to complete. On that list, you will have notes that you took yourself for things that you would like to work on/improve, and notes from the director, actors, and maybe other designers and collaborators. When it comes time to start crossing the notes off your list, always take care of notes given to you by others before the notes you took on your own.

The reason for the rule should be obvious. If a director or other designer sees the same problem several nights in a row, after a note has been given, it begins to make you look bad. People can get a bad impression regardless of how many other notes have been completed. You want to be the person who completes notes quickly and efficiently, and who never has to be asked twice.

As obvious as the rule seems when typed out, I was terrible at this before Sarah explicitly explained it as one of her personal rules. It can be very easy, especially when the notes others give you are small or simple, to push them to the bottom of the list in favor of larger or more complex notes that will take more focus.

Now, I have begun to employ the rule (sometimes needing to say it out loud to remind myself).  I take care of the notes from others first, especially if they are simple. And when I am unable to complete the notes from others by the next rehearsal, I make a point to let them know how progress stands on that specific task, and when they should expect to see it completed (often this involves waiting on shipping, or waiting for the weekend until a store is open on Monday).


Thursday, August 15, 2013

High School Tech Portfolios

While looking for another email, I recently stumbled across a conversation I had with a friend who is a high school drama teacher. He had two students who were looking to present tech portfolios for colleges and wanted to know if I had any tips. After re-reading the conversation, I decided that it might be worth sharing more widely.
Some of this I learned by creating my own portfolio during college, some of it I learned while working in the theatre recruitment office as a work study position. Please feel free to pass this along to any high school tech student you know, and please feel free to comment below or email me directly if you have any questions. 

Adam: hey - do you have any quick and dirty tips for a portfolio presentation for college?
 me: what kind?
  lighting?
  set?Stage management?
 
 Adam: Lizzie wants to SM, Zoe wants to do Lights
2:20 PM those are the only tech folks this go around
 me: They want to see progress as much as finished product
2:21 PM so if you have research images, sketches etc, include as many as you can with the pictures from the production.
  For Lizzie (SM), she should divide her paperwork into two books
2:22 PM one is a rehearsal book that contains blocking notes and anything else she used in rehearsal
  the other is a show binder that contains the script neatly marked for calling the show
2:23 PM The show binder should be so neatly and cleanly marked that any other stage manager could pick it up and call the show without having to ask any questions.
  The more samples of clean, easy to understand paperwork Lizzie can provide (that she created) the better. Contact sheets, schedules, rehearsal reports for example.
2:25 PM For both of them, it is more what you have to say about what is in the portfolio than what is physically included, so practice talking about it.
  What were your challenges on this show and how did you overcome them?
  What did you learn from working in this way?Remember, all high schools do not work in the same way. You should not assume that if you tell a college rep that you were the lighting designer, or the SM or the props master that they know what that means. You need to tell them what that meant at your high school. What exactly were your responsibilities in that position. 
2:26 PM Also from a asthetic standpoint...the pages should be easy to look at, not too cluttered (this is mostly for designers) 3-5 images per page depending on the size of the pages.
2:27 PM No cutesy creative fonts, just clear and easy to read.The photos should be straight on the page with a simple clean border around each photo (no overlapping photos or tipped artsy angles). Resist the temptation to turn this into a scrap book.
2:28 PM Make sure you can easily read the name of the show, author, director and perhaps the names of the costume and set designers (whose work will also be pictured in the lighting design photos)
  keep your shows on either two or four pages, never one or three
2:29 PM In other words, I want to open to a page and have everything I see belong to the same show.
 
2:37 PM Also, shows do not need to be in chronological order
2:38 PM take your three most impressive pieces and put #1 first, #2 in the middle of your portfolio and #3 at the end. Fill in with your other shows in between.
2:39 PM Those top three don't need to be the ones with the prettiest pictures, they may just be the things that are most unique, that set you apart
2:40 PM Anything that might be different than what the college reps have been looking at all day.  
 
 
Adam: does Lizzie (SM) want to include any pictures in her portfolio?
2:50 PM me: If she does, not many
2:51 PM They can give her something to talk about "getting all the cast organized for these vignettes and in and out and up and down the ladders and the stairs was one of my big challenges and this is how I did it"
2:52 PM "As you can see by the costumes, I had a lot of work coordinating X with the designer and the wardrobe crew"
  Her pictures should be limited, a small portfolio of pictures (could be binder sized) to go with her beautiful books of paperwork
 Adam: Should Zoe include old lighting plots that were created on Word before she knew what she was doing?
  
 me: yes she should, put them later in the book.
2:54 PM They will be interesting to the college reps because they show a desire to learn and, when shown with the better, later ones, an ability to self teach and improvise when she doesn't have all the skills yet. When she shows them she should present them in that light
  "this is where I was three years ago, I knew what I needed before I had been taught how specifically to do it, and this is the way I found to get things done"Remember that you are in high school and the colleges don't need you to know everything coming in. They want someone who is excited to learn and able to be taught. They want someone who is passionate about theatre, driven, ambitious, and willing to work hard. They want someone who is collaborative, and cooperative, responsible and respectful. Emphasis those qualities, regardless of the quality of the photos you are able to show, and you will have success. 

Saturday, August 10, 2013

Letters

It was important to me, that the three letters we needed in Twelfth Night at Oak Park Festival be distinguishable from each other. 
The first, a fake love letter, was printed on this cloud and rainbow paper I had leftover from another project. 
The paper was not wild, but just unique and silly enough to make it distinctive (and recognizable the next time it appeared). The text was printed on the plain back side so that the interesting side was more visible to the audience while the actor was reading it.

I decided the second letter would be written on a cocktail napkin. As opposed to tearing napkins and writing that same note over and over I printed out the copies of the note on thin printer paper, 
 Then I cut them out and used modge podge to attach them to the napkins. 
They were still floppy like napkins, but sturdy enough to hold up while being a bit abused during a humid outdoor performance. 
The third letter was printed on a sheets of yellow legal tablet paper. 
Did you know that you can carefully tear a sheet off of one of these pads along the top perforations, and feed it directly through a printer?
You can!
The girl at the print shop at Office Max was super surprised
And if you use a handwriting font (I usually download them from dafont.com), it looks authentically handwritten even very close up. 

Monday, August 5, 2013

Quick-Rig Drapes

The beginning of Invasion at Silk Road Rising is supposed to look like an Arabian Nights Arab cliche. We're talking draped colorful fabric, palm trees, and maybe lush fringed cushions. We also needed everything to disappear quickly as the illusion is shattered. For palm trees and cushions that is easy. For draped fabric that needs to be re-rigged by the run crew each night before the show, and torn down during the show by "angry" actors, it was a bit of a puzzle. 
Our awesome and easy solution was this,
That picture, if you can't tell, is a standard wooden clothespin, pressed onto a sticky Command Strip
In case you somehow have never used these, they're amazing. I use the hooks all the time to add places backstage for actors to hang a prop or costume quickly. And they work exactly as advertised, pull down on the strip to stretch and remove and it leaves no residue. Be sure to check the label when you buy. Different strips are rated for different weights

The clothespins easily clip onto the ends of the fabric and hold them in place, but the hold is loose enough, that a slight tug down releases the fabric from the clothespins and allows it to be quickly removed and dragged offstage. 
We have had problems with some of the clothespins twisting and breaking (because the pins were cheaply made) but the rig is so easy to take down and redo, the best solution was just to give the run crew plenty of spare pins and command strips. If one breaks our ASM is easily able to replace it while rigging the fabric up the next night. 
As a side note, this beautiful fabric is actually Indian sari fabric, purchased at an Indian fabric store in the Devon neighborhood in Chicago. The woman at the store was incredibly helpful, but the pricing can be confusing. The sari fabrics are on rolls mostly, but the pricing is by sari. Each sari is roughly 6 yards long. The more you know...

Tuesday, July 30, 2013

Forte Piano

One of my biggest worries going into our production of Amadeus, was the forte piano. You simply can't do the show without it, it's the focal point of several scenes and needed to be beautiful. 
Our costume designer proposed a brilliant solution. As it turned out, one of the local universities was planning to do Amadeus this coming school year. She put me in touch with the set designer there and we decided to share the work. The University paid for the materials (about $200), and gave me their shop space to work in for the day. They also sent me a student assistant for a few hours to help. I did the research, shopping and building, and the set designer at the university did the painting. 
 The piano was built with a plywood base and lid. 1x12 framing, and bendy-board for the curved side. There is a 1 inch plywood curve, cut to match the curve of the base of the piano on the top edge of the bendy board which helps it hold it's shape. 
To create the keyboard I used a single piece of 1x12 and ran it through the radial arm saw at 3/4 inch increments. Each cut only went about half way across the width of the board, leaving everything attached on one edge. This allowed me to only worry about attaching one piece, and allowed me to keep even spacing along the keyboard. 
The black keys were cut from a piece of 1x which had been ripped on the table saw to the correct width I needed. The ends were curved down by briefly running them past the belt sander. 
 The legs of the piano were Oak railing pieces purchased at Menards and cut to length. They are attached with long lag screws going from the inside of the piano (attach these before the keyboard) down almost 5 inches into the leg. 
 I used an extra leg, hinged to the inside of the piano to hold the lid open when needed. 
 I ended up having to cut the lid twice. The first lid I made from immediately tracing the base, when I initially drew it, and cutting both at the same time. Unfortunately, since my carpentry was not perfect, and the sanding and smoothing of the curve after cutting each piece was not exact, the first lid didn't fit at all. I traced the top of the (almost) finished piano to create the second lid and the curves matched much better.
 And here is the finished piano onstage, finished and painted. 
 I was very proud of how it turned out. 


Thursday, July 25, 2013

Nipples of Venus

For Amadeus, at Oak Park Festival Theatre, I created this tray of sweets for almost no cost. 
The script described nipples of Venus, as brandied chestnuts, dipped in sugar. 
A google image search gave me a lot of good information too (and surprisingly few pornographic pics considering the word nipple was part of my search)
They look something like this
I used my go-to salt dough recipe (one part salt, one part flour, add water VERY slowly until you reach the right consistency to mold what you need, bake on your ovens lowest temp until hard)
 a small dab of brown paint to each ball, and some extra ribbon and a silver sugar bowl made the tray look full and impressive. 
The grapes sitting on top of the tray were for the few pieces that were supposed to be consumable. From the distance of the audience, they were unnoticable, and they were easy for the actor to eat quickly and easily without gumming up her throat or being forced to chew something sticky before her next line. 

Tuesday, July 23, 2013

Golden Chairs

Let me start by saying that for Amadeus, at Oak Park Festival Theatre, we had just about zero budget. I had to be incredibly selective in how I spent my money because the script calls for many props very specifically. 
I was especially worried about furniture, after seeing nothing that could immediately pass for Rococo chairs in the limited stock, some plastic garden chairs caught my eye. 
 
There is no garden scene in the show, but I wondered if there would be a way to add an upholstered seat in order to make them feel like indoor dining chairs.
I found three chairs in total, two that looked like the green one above, and one that looked like this white one. After a coat of gold paint, they looked just flowery and over-the-top enough to pass as authentically Rococo. 
 By using a fender washer to hold a screw through one of the holes in the plastic seat, into a plywood circle I cut, I was able to attach upholstered seat cushions without damaging the chairs. 
 I think they turned out well, and they worked perfectly for the moment when Salieri talks about how he was able to buy lavish new furniture for his apartments.