Monday, February 25, 2013

UV Lamp

In Disconnect at Victory Gardens, one of the hardest pieces to figure out was a UV lamp that had to be assembled onstage and then light (why do play-writes do these things to us?)

First, just for fun, are a couple pictures of the box I created. By the way, I bought the perfect box at The Container Store, which I forget about sometimes, and then every few shows I am reminded how useful and awesome they are. Add a few collaged images printed in different sized, and it looks pretty sleek from the audience. 
The lamp, in it's deconstructed state fits perfectly inside the box with a fake set of instructions for assembling. 
When it comes out of the box, the lamp looks like this, with the top and base only attached together by the wire running between them. Also, totally unrelated, this is the image where you can best see the purple gel I added to help the light read as more UV and less white LED. 
As you can see in this next image, the lamp was originally constructed with the top fitting onto the base using a ball-in-socket type joint.  
Using my Dremel I ground the metal down on the ball so that it was flat on two sides. I also used the grinder on the Dremel to open up the hole in the socket a bit so that the flattened ball would slip right in.
Here you can see that it slipped on fairly easily without pinching the wire.
Finally the actress holds the base and twists the top into place. By rotating the top 90 degrees, she now has the rounded sides of the ball facing perpendicular to the slot. These sides of the ball are too wide to pass through the slot, so the top of the lamp is locked in place. 
And here is a picture of how the lamp looks fully assembled. 
Though I rewired the inside of the lamp several times (I broke lots of wires troubleshooting, and wired out the switch so I could give the lighting designer absolute control), I left the original plug and LEDs so the lamp was still functional. I especially loved hearing the audience around me quietly gasp when the light turns on because they weren't expecting it to actually work :)

Wednesday, February 20, 2013

dressing up wedding invites

Early on in wedding planning I told my fiance, "I don't care about paper, please remember that I said that. Please remind me that I said that when I am tempted by all the pretty, customized, unique, beautiful shiny invitations and programs and escort cards that people will be trying to sell me."
(as with pretty much everything wedding, this was my personal decision, and I am in no way judging anyone who put lots of time and money into their wedding invites, I just knew it wasn't a priority for me.)

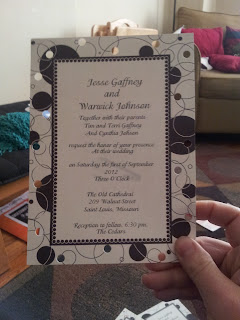
We ended up finding some very cute black and white invites from  www.123print.com, Our wedding was starting to develop a bit of a black and white polka dot theme and these fit right in (and cost less than $1 each). As well as they fit with our wedding, they didn't seem very beautiful or special. I had a plan to add pops of color to the invites to echo the pops of jewel tone color we were planning to have in the wedding decorations. 
I got out my pack of crayola "Bold" markers and started experimenting (we had about 20 extra invites to play with).
I tried filling in some of the larger cirlcles
Using my hole punch to punch out circles, 
tracing hollow circles
filling in tiny circles, 
partially tracing circles, 
adding a colored border around the text, 
And tracing the large circles, 
Eventually we decided that we liked the filling in of small circles and tracing of large ones, we combines them and then I spent a very long time duplicating the design over all 200 invites. 
I was proud of the result, for some time and the price of a pack of markers I was able to get a great effect for very little money. The only thing I regret in retrospect is that I didn't invite friends over to help. The whole project would have been more pleasant and gone exponentially faster (it took me about 6 hours) if I had a bit of help. 

*note: 123print.com had amazing customer service and reprinted our invites at no charge when I realized there was a typo and I had listed the wrong time on the invite.

Friday, February 15, 2013

Fake Indian Lunch

In Disconnect  one of the characters is eating lunch at his desk. We decided that the lunch should be contained in a tiffin, a small stacking tin that many Indians use to pack lunches.

 In the top section, I added a few pieces of flatbread so that he could take a few bites at the beginning of the scene.
In the bottom half I created a "chickpea" dish with wooden beads and a few chopped up pieces of fake greenery, all coated in elmers glue to hold it together. Up close you can see the holes in the beads, but from the distance onstage they weren't visible.
Also, in a funny shopping twist, I called five different local Indian import and supply stores looking for this at the last minute (initially we had decided he would be eating a sandwich) in an attempt to avoid shipping costs and time delays, none of them had anything or could even recommend somewhere else that might. 
After giving up on the local route, I went online to search and discovered World Market sells this one for $10, and stocks them in store. 

Sunday, February 10, 2013

Working with Actors

In the four shows that I have done with a certain theatre company, I have always found myself having trouble with the actors. They don't seem to know how to handle their props, they don't speak to technicians with any respect, and there are more than the usual number of divas.

On the most recent production with this company I found what I believe to be the source of this problem.

We were looking for a space for a crossover for the actors backstage. There was plenty of space behind the large cyc, but none of it was ideal. We were using large cyc lights to back-light the drop; if the actors passed in front of the lights they would cast shadows, but if they passed behind they had to deal with a large number of cables as trip hazards. After seeing some spare sheets of masonite/hardboard backstage, I suggested that we lay the sheets end to end behind the lights, Gaff tape them together and gaff tape them to the floor, to create a bridge over all of the cables. 
"No," The production manager responded, "what if the actors kicked the lights while passing behind them."
I stared at the 4'-0" wide pathway I was proposing and was confused, it seemed plenty wide enough to me, " We could lay down a white tape line on the front 1'-0" of the masonite and tell the actors to stay behind the line," I offered, "that would keep the actors well away from the lights."
"No," I was told again, "actors are stupid, they will find a way to break things." The assistant stage manager, stage manager, and production manager were all in agreement. 
I was shocked, but suddenly I understood why I had all of the problems that I did with the actors at this company; they didn't behave intelligently or respectfully because they were not treated with respect and were assumed to be unintelligent. They didn't know how to handle their props, because the stage manager assumed they were stupid, and didn't bother to explain things to them. I discovered later that day that while I had taken the stage manager aside to carefully explain all the changes that had been made going into first tech, she had never bothered to pass any of that information on to the actors who were using the props.

So for the record, and for all those theatre artists who may be holding ignorant opinions, actors are not stupid. I have encountered this type of attitude among high-schoolers sometimes, and once in a while with a frustrated college student, but I was shocked to discover this attitude among seasoned professionals. I would have thought that someone who held this type of opinions would have gone onto an alternate career pretty quickly. 

I will say it again, actors are NOT stupid. Actors have a lot to focus on during a performance. They need to be thinking about their next scene, their next costume change, their choreography and their lines. Props, costumes, sets and special effects need to be straightforward, and predictable. They need to work the same way every time. If there might be complications, or if the piece might fail in some way, they need to be informed, and they need to be told what they should do if the piece does fail. Actors are not stupid, but with the dozens of things they need to be remembering at any given moment, in addition to our expectation that they be tuned into their emotions and making the character come to life, they can sometimes have trouble focusing on the complexities of a technical element that needs to be incorporated. 

"Don't get too close to the lights" might be a bit subjective and vague, they might need to know more about how the lights are wired and bolted down in order to understand how close is too close. "Stay behind the white line" is more clear; it can be quickly, visually processed and allow the actor to move on to focusing on the performance. 

Actors are not stupid, but they do need clear communication and instruction. If you can't explain what you need them to do with a prop, costume, or special effect in three easy steps, it's too complicated. The actors will never know as much about props as a props master, or as much about clothing as a costumer, and they should not be expected to, that is your job. Calling actors stupid because you are having difficulty creating an effect that works simply and consistently is an easy excuse. Push yourself to find new solutions or to more effectively troubleshoot the ones you have. Remember a piece might be easy for you to operate, not because it is easy, but because in creating it, you became intimately familiar with it's construction.

And if you are still convinced actors are stupid, at the very least keep your opinion to yourself. You never know when you are making a bad impression on someone like me. 

Tuesday, February 5, 2013

Resealable bag

For Disconnect" at Victory Gardens, I needed a cheap disposible bag of party whistles to be easily resealable.

 To do this I used the original bag and cardboard header from the whistles, a bit of magnet and some metal plumber's strap.
I glued the plumbers strap inside the cardboard, and then the bag on top of that. The magnet glued to the other side is strong enough to hold the cardboard closed through the two thin layers of plastic bag.
As a bonus, this rig added some weight to the bag, which helped the actors to toss it across the stage like they needed to.

Sunday, February 3, 2013

Awesome

One of the many many reasons why I love shopping at American Science and Surplus- Best labels ever!