Monday, October 25, 2010

Another Magic Wand

This magic wand is for Glinda in the Wizard of Oz.
The director wanted it to be larger, almost like a baton, but still magical, and sparkly.

I used this wand as my inspiration.

For the base of the wand I bought a short, thin copper tube from Home Depot.
I added a plastic prism I bought at the craft store to the end and secured it with epoxy putty.


After securing the stone I wired up the circuit. I used a 3V watch battery, a small toggle switch and a large LED bulb. I made sure I had long leads on the wires to and from the bulb so that the switch and battery could be on the bottom of the wand and the bulb could go as far up the tube as possible. When I flip the switch, the LED lights up the entire prism and the the glow looks almost magical, because you can't see the light source. 
To get the natural vine look on the outside I used layers of hot glue.
And I used a large amount of hot glue at the end to secure my switch and to help hide the switch and battery.
After that I painted the entire thing gold and added some more rhinestones (because who doesn't want more sparkle)


Here's the full finished wand, I know I would have wanted one when I was ten.

Wednesday, October 20, 2010

period baby bottle

Also for Three Sisters, I was asked to provide a baby bottle for Natasha to give to the baby.

As luck would have it, my favorite antique store had a vintage baby bottle. The first challenge was to find a nipple for it.

I ended up cutting a regular baby-bottle nipple to fit the top. I filled it with hot glue so nothing could leak out the tip, and I sealed it in place with more hot glue.

The second challenge was caused by the first. I needed a milky liquid that wouldn't go bad, because with the hot glue seal I wasn't going to be able to refill the bottle.

I ended up using coffee mate, powdered non-dairy creamer. The look of it is just about perfect, but after a few days it did start to separate. It still looks fine if the actress shakes it a bit before going on stage, but next time I think I will try liquid non-dairy creamer.

Also, since I'm sort of on the topic. A while back, a friend of mine was given the challenge of having large amounts of drinkable milk on stage. The actors were supposed to be ladling milk out of a large dairy jug, and then drinking it. He would have put a false bottom into the jug, so he didn't have to fill the whole thing, but still we're talking about a gallon of milk each night, a nasty cleanup, and singers who really don't want to be drinking milk (it isn't great on vocal chords). He didn't end up having to worry about it, because it got cut, but I was stumped by the question. Does anyone have any ideas? Anything you have used as a milk substitute on stage in the past?

Sunday, October 17, 2010

Red Caviar

While working on three sister, pretty late in the game, it was decided that we needed some sort of edible something in the first lunch scene. I didn't have a lot of money left, and no access to a fridge to store things in (which severely limited my options).

I ended up buying some simple crackers, red food dye and peanut butter. I dyed the peanut butter red, spread a little bit on each cracker and Voila! Instant, cheap red caviar. Not perfect, but close enough to the research image to be believable from a distance.

Friday, October 15, 2010

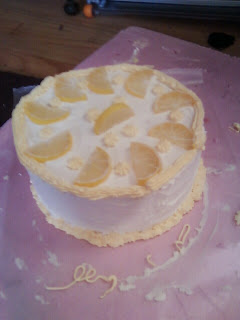
quick, cute, fake cake

I made this cake in about an hour for a production of "The Three Sisters" at the Piven theatre workshop. I wanted something simple, bright and springy.
I started with some leftover pink insulation foam and cut two nine-inch circles. I glued the two layers together with Patch-N-Paint lightweight spackle (found in the paint department of your hardware store. I believe some brands are called Fast-and-Final. You'll be able to tell you have the right tub of spackle because it seems ridiculously lightweight).

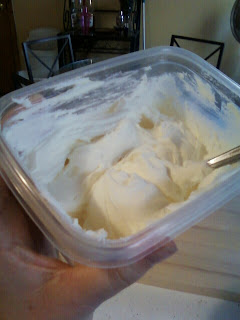
I then took some of the same patch-n-paint and mixed it in a tub with a couple drops of yellow food-coloring until I got a buttercream color.
 I used it and a regular kitchen butterknife to ice the cake. The fast-n-final makes an amazing frosting because it is almost exactly the texture of buttercream icing, and it dries very fast. Even in the thickest spots, the cake was dry in four hours and ready for rehearsal.  In the future I will use a screw up through the bottom to hold the cake in place while I ice it. It got difficult and messy when I was trying to do the sides. I will also put a piece of wax paper under the cake to start, I ended up doing this later, but it would have been a better idea at the beginning.
The lemons on top of the cake I bought at JoAnns and cut in half. I like fake fruit on fake desserts, it adds color.
After I got the base of icing down I mixed up a second batch on icing and yellow food-coloring, this time much darker. I had purchased a pastry bag tip and the collar that holds it in place, but decided to save money by not buying pastry bags. I figured I could use the sandwich baggies I already had at home. This might have worked if I had nice, brand-name freezer bags, but my dollar-store baggies couldn't take the pressure of me squeezing, and immediately split along the seams. I ended up cutting off the corner of a garbage bag to use instead. Not perfect either, but much better.
If I had been more patient, I'm sure the borders could have looked much prettier and neater, but for a rush job it turned out to be a pretty cute cake.

Tuesday, October 12, 2010

Props awards

Recently I have had multiple discussions with people about the lack of recognition and awards for props. The conversations usually start when someone I am working with has the sudden realization, "They don't award a Jeff for props do they?" The answer is no, they don't. I have talked to many props masters that don't want to be recognized. They believe that if someone notices the props, then they aren't blending in well enough and they aren't doing their job. On some shows I can agree with that idea, but I have worked on other shows where the props were central, I worked incredibly hard on them, did work that I was proud of, and would love to have the chance to be acknowledged.

Right in the middle of this series of discussions, Eric Hart put up an article about the same subject over on his props blog, "Why is there no Tony Award for props?" Apparently this is on more people's minds than just mine.

I acknowledge that to an outside observer it can be sometimes hard to discern what is props, and what is scenery (who selected/designed the furniture for example), but with all the crossover between all areas of design in collaborative theatre we still manage to separate out the other categories.

Recently, I have to admit that I have become more offended when reviews and playbills fail to list me as a designer. I was treated as a designer all the way through the rehearsal process, until credit was given for the work. I attended design meetings, was asked to give a design presentation at the first rehearsal, went to the designer runs of the show, sat through tech and dress rehearsals and previews and took notes with the designers, and then when the program was put together I was not listed with the designers, instead I am listed as staff.

This is not just a Chicago thing, as Eric Hart researched in his article, he could not find a single awards show in the country that acknowledges props.

I am, of course, terribly biased on this subject. Everyone would like to see their work recognized, but there are no awards for stage managers, production managers or technical directors either.

I'd love to know what you think.

Monday, October 11, 2010

Jello Blood

Sorry for no pictures lately to accompany my posts. I left my camera briefly in the kitchen at one of the theatres where I work.
This kitchen also happens to be home base for a church food bank. Local homeless people tend to wander in and take things. I am thinking that the camera is gone. (not that all of the people who use the food bank are untrustworthy. I have paid some of them to help me move furniture before and they have been very nice, helpful and a pleasure to work with.)
Anyway, I was taking pictures in the kitchen because I was in the process of cooking up some fake blood. I'd love to share the do's and don'ts of this project with you.

The challenge here for me was the amount of blood needed. At a dramatic high point at the end of Act 1, one of the characters is describing a massacre. As he is describing the machine-gun fire that killed dozens of people, we wanted the bullet holes in the stucco walls to start oozing blood.

The first batch of blood I made was based on my go-to recipe, only with more water and no chocolate sauce. I turns out, with the amount of corn syrup I was using, at $2 a bottle, it was going to cost us around $10/show to run this effect. Too much when there are 25 performances.
I did a little more research and came around to the idea of using thinned Jello. Each packet of Jello calls for 2 cups of boiling water to dissolve the gelatin and 2 cups of cold water to set it. I used the regular 2 cups of boiling water and then 8 cups of cold. A total of 10 cups of water per Jello packet. The result was a thick, syrupy liquid that cost only around $4 per show. Significantly cheaper.
I used Raspberry Jello (tends to be darker than the strawberrys and cherrys which can be too pink or red), and sugar free (to cut down on the sticky).

One of the major problems that I had was darkening the Jello. I started by trying to use coffee-mate, like I use with corn syrup blood. I was hoping that the milky color would make the blood more opaque and would provide the same non-stain characteristics it provides in corn syrup blood. When I first mixed it in, it looked good, but later I discovered that the coffee-mate didn't mix with the gelatin, and it ended up settling out as a film on the top of the liquid.

After a lot of thought about what would mix well with gelatin, I realized the best answer was more gelatin. I mixed in a packet of Jello chocolate pudding per 4 packets of raspberry jello and the color was perfect.

The effect ended up getting cut because we couldn't get it to work consistently, but I think that the new info I learned about fake blood is still worth sharing.

-There was a danger of the Jello setting too much in places along the tubes and hoses and clogging up the system. My guess would be that you would need to flush out the system once a week or so with hot water or even cleaner to keep everything in order.
-On the same line, I recommended that the ASM run the pump for a few seconds pre-show every night to get the air out of the system.
-I think the biggest problem might have been the pump itself, as sump pumps are not built to handle thickened Jello. I would recommend something more heavy duty. The garden fountain pumps I have used for effects in the past might have been a better bet.
-Jello is sticky and smelly. I smelled like raspberry for days. Our stage was covered in sand, so we put cat litter at the base of the wall to aid with cleanup. Though the Jello seemed to wash off of walls and out of clothes very well, the sooner you wash it off, the better. And take steps against ants and bugs, they will be a problem if you aren't careful.
-The jello also started to ferment sealed in the tub we kept it in. My guesstimate is that you would want to use the blood within 3 or 4 days of making it. I was hoping to make all of what we needed at once, but it turns out that wouldn't have been an option.

In the end though I think that the cheapness of the Jello blood makes it a very important option to have when gallons of blood are needed.