Wednesday, February 29, 2012

Disappearing Dinner

The first scene in Hunger at Lifeline Theatre takes place at a fancy anniversary dinner. It is supposed to appear as if a lavish meal has just been completed. Unfortunately the entire setup needs to disappear in seconds. leaving only the desk beneath it, and only one actor is available to strike it. 
To accomplish this I started by cutting three pieces of lauan to match the size of the table top. I taped the lauan together along the seams creating hinges. Then, from the underside up, I screwed all of the flat dished to the lauan.
 This first picture is of the table as it appears during the scene.
 Then the scene ends, the actor striking the dinner moves all of the tall pieces (wine glasses and bottle, 2 stacked dessert dishes) to the center of the table, leaving only flat pieces on the sides.
 From there, all the actor needs to do is lift up the two large side pieces and everything folds together to be neatly carried offstage.
Only one of the flat dishes ever holds any real food. I chose this small light dish for the "last bite of cake" that is consumed during the scene. So that this dish could be removed and washed by stage management , this plate is attached with Velcro instead of being screwed down. 

Saturday, February 25, 2012

Russian painted tray

Sometimes the trickiest props are ones that no one else even notices. In Hunger at Lifeline Theatre, I was having trouble figuring out what to do about a small tray that was needed to carry a bowl of soup and a roll. Nothing I could find seemed right.
In any other situation I would probably have used a wooded tray to give the impression I wanted, but several scenes earlier we see the characters burning books in order to stay warm. I couldn't justify to myself that these scientists wold be burning books and would have left a wooden tray intact. All of the silver metal trays I found in stock though seems much too cold and formal. 
I realized what the answer was when I stumbled across this old tray at an antique store. Of course, the tray should be a beautiful old Russian painted tray (also the show is set in Russia).
I couldn't afford to buy this tray (or any authentic Russian tray) on my budget, but I took this closer photo of the painting at the antique store and resolved to do it myself.
I started by painting a stock silver tray black. Then I used a small brush to add a base layer of color mimicking some of the strokes I saw in my research photo.
A second coat of paint in different colors gave my flowers a bit more dimension. 
Then add some distance, and a bowl covering part of the plate and you have a very convincing fake antique. More importantly it fits into the mood of the scene without being visually or conceptually distracting.

No one else ever mentioned my tray (or even noticed it I think), but often that is the entire point. 

Monday, February 20, 2012

large sugar crystal

Unfortunately for the blog, I didn't remember to take photos of the project until after it was over, but I will try to explain my process as well as I can with the images I have. 
 I started with a bar of wax I had leftover from other projects. I used a hammer and a screw driver to break off a variety of small chunks. 
I attached the chunks together in a random pattern, melting each one a bit to hold it in place. 
Once I had the shape and size I was looking for, I coated the entire things with a coat of melted wax dyed yellow, and then once the first layer was dry another coat that was more orange-brown. 
After the wax was cooled, I began to carve away bits of wax with my matte knife. I needed to remove all the smooth and rounded corners and to remove the majority of the darker wax.
 
 Once it was completed, the small cuts gave the crystal a much sharper look, made it appear to be composed of far more smaller crystals, and gave of a sparkly shine because it had so many smooth surfaces at a variety of angles reflecting light.

Wednesday, February 15, 2012

Break-Away chair

This break-away chair was a feat of engineering created by Maria Defabo and I for the current production at Lookingglass theatre. The chair needed to break each night, but needed to be sittable for several scenes before the break. To make things more difficult, there is an identical chair sitting right next to the trick chair, so any major alterations to the structure and shape of the chair would have been immediately obvious.
This is how we did it. 
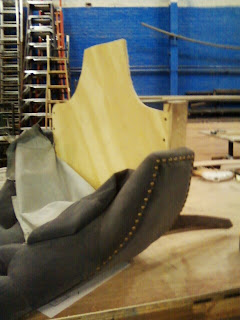
This first photo shows you the chair untouched, after removing the black fabric from the bottom.
First we removed the piping and pulled all the staples around the front edge so that we could pull back the fabric. 
Next the cushion was removed. 
Then we cut and removed all of the springs (leaving them on made it impossible to alter the chair as they kept pulling things back wherever we made a cut).
We also removed the corner braces on each of the front legs so we could rig them to break.
After all of that was removed, this is what the under side of the chair looked like.
To start the rigging, I cut off the front part of the chair,
And cut it into three pieces.
We added a piece of plywood, cut to fit the chair, in on the top side of the seat. Partially this was to support the weight of a person sitting on the chair (the job the springs used to do), and partially it was to reinforce the rest of the chair frame, so that only the parts we wanted to break actually broke. 
We added an identical piece on the bottom side of the frame, creating an incredibly strong box under the seat.
To make the legs break, we created these wooden pieces. The holes are where they are bolted onto the frame, and the break occurs along the scored cuts in the center.
Each show, a new breakable pieces is bolted in across the break on each leg. On the front of the chair, the breakable legs attach to the center piece with small bits of dowel.
'
Finally we staple the bottom black fabric back in place
leaving just the corner open, so that the chair can be re-rigged. After rigging, a couple of strips of gaff tape hold the fabric in place so that, until it breaks, the chair appears to be in perfect, untouched condition. 


Friday, February 10, 2012

Never be Afraid to Ask...Branches

For this spring's production of Brother's of the Dust at Congo Square theatre, the designer wanted two trees on the set. They weren't terribly large, about ten feet tall each. I know there are other technicians who will argue with me about this, but I decided to use real branches to make my trees.

Side Note: I have heard stories about problems with moss, dry rot, bugs etc and know people who refuse to use real branches for something like this. In my experience though, there is no good way to make a fake tree look real. My policy is just to be extra careful with what I bring into the theatre. 


There are some places where locating several large branches that I can take, cut, bend and twist into trees would be as simple as walking outside the back door of the theatre. In the middle of Chicago though, large branches can be harder to come by.

While props shopping for the show I drove past an empty corner lot with a pile of large branches in the center of it; exactly what I needed! I pulled over and called the number on the large sign on the chain link fence. I explained to the woman who answered the phone who I was and what I needed. She spoke briefly to her boss and then told me that I was welcome to whatever I needed. I could untwist the wire holding the gate together and walk right in as long as I closed the gate when I was done.

I drove home, grabbed my cordless Ryobi circle saw, went back to the abandoned lot and collected my branches.

When I installed the branches onstage I had a bit of trouble because they were dryer and more brittle than fresh cut branches (which often bend easily and can be secured in place with a screw). But I was able to reattach the branch to itself where I needed to and add other pieces and sticks in where it was looking bare. I hot glued a small amount of leaves onto the tops of the trees to finish them off and it ended up working perfectly.

Sunday, February 5, 2012

The highest compliment

A couple weeks ago a friend of mine asked if he could borrow some of my fake ice cubes for a show he was working on. I told him he could, but finding a time to meet up with him to hand them off proved to be a challenge. Eventually we decided that I would leave the ice for him wedged in the door outside the office for his church, where he would be later in the day for choir rehearsal.
When I dropped off the ice I sent him a quick text double checking that I had left them in the correct place.
A couple hours later we had this exchange of text messages:

Tim- Hey. Sorry I didn't see this. Rest assured I have it in my possession. Thank you!

Me- That's okay. Glad you found it.

Tim- Karie thought it was real ice and put it in the freezer. lol

Me-That's awesome. My work can receive no higher compliment.

Tim- Certainly not!

That someone could see a sandwich bag full of fake ice cubes I made, pick it up and carry it to the freezer and continue to believe the ice is real, made my day. Though I have to wonder what this woman must have been thinking was the purpose of someone leaving a sandwich bag full of ice, with a pink sticky note with Tim's name on it inside the door to the church.