Showing posts with label fabric. Show all posts

Monday, August 25, 2014

Printed Canvas Map

For Butler at Peninsula Players Theatre, we needed a canvas map to hang on the wall of the Civil War General's office. The set designer, Jack Magaw, provided the image and I had it printed on nice paper at Office Max, but it was still just paper. I needed it to be stronger, especially since it was going to be manipulated by the actors nightly. 
I purchased a piece of "duck cloth" canvas and used spray adhesive to attach the paper to the canvas, then went to the costume shop to borrow their serger sewing machine and serge the two layers together. 
Here is a close up of the two layers serged together from the front, 
 and on the back side. I am unsure of whether the method would have worked as well if I had printed the map on lower quality paper, but with the higher quality stronger paper, the sewing of the two layers together resulted in clean strong edges that I am confident will last throughout the run of the show. 
 To hang the map we purchased two 3/4 inch dowels and used the table saw to cut a groove into each. 
 We filled the gap with wood glue, slid the map into the slot, and then added brad nails to secure it in place. 
 The brad nails were a bit too long, so once the glue was dry we took the map over to the grinder to smooth off the ends on the back. 
 Here is the final piece laid out on the floor, ready to be hung on the wall of the set, and hopefully looking like it is ready to be rolled up and taken onto the battlefield. 
 And for good measure, and image of the canvas back side of the map too. 


Saturday, August 9, 2014

Civil War bag

For "Butler" at Peninsula Players Theatre, I needed a small bag stuffed with supplies for one of the actors. Usually, with a period play like this I would have to do a lot of research to get a good idea of what the bag may have looked like. Fortunately, with a Civil War play, a lot of the research has already been done and is easily accessible on sites used by Civil War reenactors. I was able to easily locate several images of white canvas "haversacks," and several sites that sold reproductions and even listed dimensions. I chose this one to base my bag on

I found some cut up pieces of an old drop cloth lying around the shop, which turned out to be the perfect fabric. I cut a 16" square for the front, a 22" piece for the back, and a long thin strip which I sewed in half for the strap.
I used a safety pin to slowly turn the strap inside out to hide the loose edges. 
Then I pinned the front and back together, cut the angles on the two bottom corners and stitched around the outside. 
Before turning the bag right-side out, I snipped the corners on the bottom so the seam would be flat and not bunchy.
I turned the bag right-side-out, cut a curve into the top edge of the back piece (the flap) then turned under the edge 1/2" and stitched it in place.
The costume shop manager was able to give me a bit of a broken belt to use for the bag closure. I cut off a piece about 6" long and stitched the end to the flap of the bag.
As a side note, I was a little worried about breaking the needle on the sewing machine by trying to stitch through the thick leather of the belt. As I have done before in these situations, I still used the machine, but I turned the wheel by hand as opposed to using the electric pedal. It takes a little longer, but allows me to control the needle a bit more so it doesn't get forced through somewhere it doesn't want to go. I still get the nice, strong even stitches of the sewing machine,, but don't risk breaking a machine that was not intended for such industrial materials.
I took another bit of the belt, about 4" long, and stitched it to the base of the bag, as a loop to hold the strap. I found a small buckle in our stock and stitched that on as well (that one I did by hand).
Here is a look at the finished closure. 
The final step was to sew on the strap. In hindsight, it would have been MUCH easier if I had thought the project through before starting, and had attached the handles to the back of the bag before sewing the front and back of the bag together. I was still able to get a good stitch line down both edges of the strap, on both sides of the bag, but it required lots of twisting and pulling the stretching of fabric to get my needle where it needed to be without accidentally catching some bit of fabric I didn't want under my needle.
Here is the strap nicely stitched in place. 
Here is the finished bag. 
And here is the finished bag loaded with supplies and ready to go into rehearsal. 
Total, the project took about 2 hours and was a very satisfying productive break between some larger projects. 

Saturday, November 30, 2013

knotted lamb and baby

For Paulus, at Silk Road Rising, the concept of the show was very theatrical. We felt specifically that two props, a dead baby, and a sacrificial lamb, would be far more effected if we abstracted them from the draped fabric world of the costumes, than if we were to try to create something totally realistic. 
Unfortunately I took far fewer photos of the process than I meant to, but the ones I have here should give a good basic idea of what we did. 
The first step in something like this is to create a skeleton. We wanted to props to be limp and floppy, but if they had been all fabric, the form would have easily been lost, and the effect wouldn't work. I looked up research images of lamb and human skeletons and cut dowel rods to match some basic skeletal structure. I glued the dowel rod to clothesline, with gaps at the joints to allow free movement at those places. 
Next the skeletons were wrapped in a base layer of fabric to hide out structure. I tied shorter knotted pieces at certain joints to prevent them from extending too far in unnatural directions (like tendons). 
Here you can see how a lamb leg is tied with tendons so it holds the shape of an actual lamb leg, with joints bending in the proper directions. 
Once the structure was in place, it became about tying and twisting many layers of fabric in order to fill out the bodies, and blend them with the world of the costumes. This is roughly what the final baby looked like. 
And here is the sacrifical lamb, lashed to a pole to be taken into the temple. The lamb was intended to be all white initially, but didn't look right. The addition of the strips of burlap added definition to the shape and had the added benefit of tying the lamb into the world of the set. 

Monday, August 5, 2013

Quick-Rig Drapes

The beginning of Invasion at Silk Road Rising is supposed to look like an Arabian Nights Arab cliche. We're talking draped colorful fabric, palm trees, and maybe lush fringed cushions. We also needed everything to disappear quickly as the illusion is shattered. For palm trees and cushions that is easy. For draped fabric that needs to be re-rigged by the run crew each night before the show, and torn down during the show by "angry" actors, it was a bit of a puzzle. 
Our awesome and easy solution was this,
That picture, if you can't tell, is a standard wooden clothespin, pressed onto a sticky Command Strip
In case you somehow have never used these, they're amazing. I use the hooks all the time to add places backstage for actors to hang a prop or costume quickly. And they work exactly as advertised, pull down on the strip to stretch and remove and it leaves no residue. Be sure to check the label when you buy. Different strips are rated for different weights

The clothespins easily clip onto the ends of the fabric and hold them in place, but the hold is loose enough, that a slight tug down releases the fabric from the clothespins and allows it to be quickly removed and dragged offstage. 
We have had problems with some of the clothespins twisting and breaking (because the pins were cheaply made) but the rig is so easy to take down and redo, the best solution was just to give the run crew plenty of spare pins and command strips. If one breaks our ASM is easily able to replace it while rigging the fabric up the next night. 
As a side note, this beautiful fabric is actually Indian sari fabric, purchased at an Indian fabric store in the Devon neighborhood in Chicago. The woman at the store was incredibly helpful, but the pricing can be confusing. The sari fabrics are on rolls mostly, but the pricing is by sari. Each sari is roughly 6 yards long. The more you know...

Thursday, April 25, 2013

Quick Window Awning

I made this quick window awning for Living Large in a Mini Kind of Way at 16th Street Theatre. We had a limited budget, and needed to build the awning to fit the small window on the set, and wanted the sides to remain open to keep the awning feeling light and decorative (thus eliminating the easiest solution of building a hard structure and covering it with fabric. 
 I found these shelf brackets with closet rod hooks on ends at Menards. By turning them upside down I was able to get the perfect shape for my frame.
 Bonus- they are pre-drilled to screw directly into the set.
 I cut a small piece of PVC pipe to fit between the two brackets and screwed it into the closet rod hooks (also already pre-drilled for me).
Then all I needed to do was staple the fabric in on the top, and secure it along the bottom with some double stick carpet tape along the PVC.
The fabric of the awning was just standard muslin which the set designer painted. Because the fabric was stiffened so much by the paint, I was able to cut the curves into the end without needing to do any stitching or sealing to prevent fraying.

Friday, April 20, 2012

upholstering a cane-back chair

For Pride and Prejudice at Lifeline Theatre, the designer, director and I pulled three upholstered chairs from stock that we liked. They were covered in a dark burgundy fabric with upholstery tacks all along the edges. I knew I needed to recover them to make them fit much more with the pastel, delicate world of the show. I was having a fairly easy time of it on the seat,
 and on the front side of the back. 
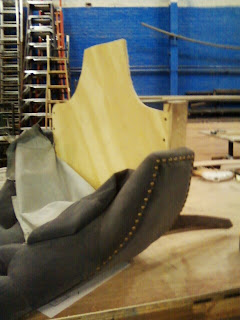
When I got around to the back side of the back I encountered a problem. These had at one point been cane-back chairs.
Whoever had upholstered them previously had just stapled in fabric as best as they could, but the fabric was loose and wrinkled and the staples were visible in places. That would never work for this show.
I decided what I needed to do was to create a new, semi-rigid panel that would fit into the back of the chair to cover the cane.
I started by using printer paper, folding, creasing and taping it in place to create a pattern of the space that I needed to cover.
 I traced this pattern onto a piece of illustration board and cut it out,
 then I used spray adhesive to attach my fabric to the front side of my cut-out.
I slit the extra fabric all along the edge of the board so that I could smoothly fold the fabric over onto the back (where it was again attached with spray adhesive).


Finally I slowly worked the board into the back of the chair. In many places I was able to wedge the illustration board between the wood frame and the old cane so that, in the end, the back panel stays securely wedged in places without any glue or staples of any kind.
 Which also means that someone can easily remove the panel and repeat the process the next time the chairs are recovered.

Wednesday, February 15, 2012

Break-Away chair

This break-away chair was a feat of engineering created by Maria Defabo and I for the current production at Lookingglass theatre. The chair needed to break each night, but needed to be sittable for several scenes before the break. To make things more difficult, there is an identical chair sitting right next to the trick chair, so any major alterations to the structure and shape of the chair would have been immediately obvious.
This is how we did it. 
This first photo shows you the chair untouched, after removing the black fabric from the bottom.
First we removed the piping and pulled all the staples around the front edge so that we could pull back the fabric. 
Next the cushion was removed. 
Then we cut and removed all of the springs (leaving them on made it impossible to alter the chair as they kept pulling things back wherever we made a cut).
We also removed the corner braces on each of the front legs so we could rig them to break.
After all of that was removed, this is what the under side of the chair looked like.
To start the rigging, I cut off the front part of the chair,
And cut it into three pieces.
We added a piece of plywood, cut to fit the chair, in on the top side of the seat. Partially this was to support the weight of a person sitting on the chair (the job the springs used to do), and partially it was to reinforce the rest of the chair frame, so that only the parts we wanted to break actually broke. 
We added an identical piece on the bottom side of the frame, creating an incredibly strong box under the seat.
To make the legs break, we created these wooden pieces. The holes are where they are bolted onto the frame, and the break occurs along the scored cuts in the center.
Each show, a new breakable pieces is bolted in across the break on each leg. On the front of the chair, the breakable legs attach to the center piece with small bits of dowel.
'
Finally we staple the bottom black fabric back in place
leaving just the corner open, so that the chair can be re-rigged. After rigging, a couple of strips of gaff tape hold the fabric in place so that, until it breaks, the chair appears to be in perfect, untouched condition.