Saturday, August 9, 2014

Civil War bag

For "Butler" at Peninsula Players Theatre, I needed a small bag stuffed with supplies for one of the actors. Usually, with a period play like this I would have to do a lot of research to get a good idea of what the bag may have looked like. Fortunately, with a Civil War play, a lot of the research has already been done and is easily accessible on sites used by Civil War reenactors. I was able to easily locate several images of white canvas "haversacks," and several sites that sold reproductions and even listed dimensions. I chose this one to base my bag on

I found some cut up pieces of an old drop cloth lying around the shop, which turned out to be the perfect fabric. I cut a 16" square for the front, a 22" piece for the back, and a long thin strip which I sewed in half for the strap.
I used a safety pin to slowly turn the strap inside out to hide the loose edges. 
Then I pinned the front and back together, cut the angles on the two bottom corners and stitched around the outside. 
Before turning the bag right-side out, I snipped the corners on the bottom so the seam would be flat and not bunchy.
I turned the bag right-side-out, cut a curve into the top edge of the back piece (the flap) then turned under the edge 1/2" and stitched it in place.
The costume shop manager was able to give me a bit of a broken belt to use for the bag closure. I cut off a piece about 6" long and stitched the end to the flap of the bag.
As a side note, I was a little worried about breaking the needle on the sewing machine by trying to stitch through the thick leather of the belt. As I have done before in these situations, I still used the machine, but I turned the wheel by hand as opposed to using the electric pedal. It takes a little longer, but allows me to control the needle a bit more so it doesn't get forced through somewhere it doesn't want to go. I still get the nice, strong even stitches of the sewing machine,, but don't risk breaking a machine that was not intended for such industrial materials.
I took another bit of the belt, about 4" long, and stitched it to the base of the bag, as a loop to hold the strap. I found a small buckle in our stock and stitched that on as well (that one I did by hand).
Here is a look at the finished closure. 
The final step was to sew on the strap. In hindsight, it would have been MUCH easier if I had thought the project through before starting, and had attached the handles to the back of the bag before sewing the front and back of the bag together. I was still able to get a good stitch line down both edges of the strap, on both sides of the bag, but it required lots of twisting and pulling the stretching of fabric to get my needle where it needed to be without accidentally catching some bit of fabric I didn't want under my needle.
Here is the strap nicely stitched in place. 
Here is the finished bag. 
And here is the finished bag loaded with supplies and ready to go into rehearsal. 
Total, the project took about 2 hours and was a very satisfying productive break between some larger projects. 

Wednesday, August 6, 2014

Thoughts on delegating

Most of the time in my props work, I am working solo. In the past year or so I've been able to have an assistant for tech week at times, but in general I research, shop, and create the props for a show entirely on my own.
Early this summer I had the opportunity to work several days as an overhire artisan at the Goodman Theatre. Working on a team with five full time props staff members and several other overhire workers was fun and very interesting. I learned a lot in a very short amount of time. With so many people around, there always seemed to be someone who was an expert in whatever task was at hand, and the shop turned out beautiful detailed work. 
Right now, I am just finishing my first week at Peninsula Players Theatre. I have an assistant here who manages props all season, and an intern who has been assigned to props for this rotation (and has worked other jobs for the other productions this season). In this situation I'm the expert, and need to be in charge of the delegating, rather than being the one who is delegated to, as I was at the Goodman. 

These two experiences have me thinking quite a bit about working as a team and the pros and cons of those experiences vs working solo. So, with my apologies for no organization strategy, here are some random thoughts on the subject. 

-When I am the boss delegating, I find I can work very effectively by starting a project, teaching someone how to do it, and then leaving them to finish. Especially in my past experience as a tech director at a theatre where I had lots of unskilled intern labor, and very few skilled carpenters, I made it a personal rule to never finish a project. I would gather all the tools and supplies for a project, start laying it out, and create a sample if possible, so that when someone came wandering up asking "what should I do now" my answer was always, "this!" Since the project was already set up I didn't need to waste any time with long explanations and lists. The intern could get right to work and I could move on to the next project. 

- The plus side of a large crew is that there is broader array of skills and expertise. If I encounter a problem with a project, I have five other people who can help me brainstorm and therefor will am more likely to find the best or most creative solution quickly. I often lament that my learning is limited while working as the only prop person on a show, because there is no one around to teach me, on a large crew there is always someone around who can teach you something, and I learned more in eight days at the Goodman than I probably did the entire rest of the summer. 

- The down side to a big crew is that often, when things are busy, it is harder to learn a new skill. If I am a talented seamstress, and another crew member is a talented welder, there are rarely going to be occasions for me to improve my welding or her to improve her sewing. When those projects come up, it is most efficient to give the task to the person who has already perfected the skills to complete it. Artists end up growing much more specialized and less well rounded. 

- You can delegate research. It's probably because most of the time when I have had an assistant it had been later in my process, but for some reason, before I was asked to do research at the Goodman, it hadn't occurred to me. I had the props intern do research for me on her first day of work and it was hugely helpful. It also helped to get her into the world of the show, which hopefully will continue to be a benefit no matter which projects I assign her going forward.

-The more people there are to delegate to, and supervise, the less you get to do yourself. This kind of goes along with the first point about never finishing a project, but I definitely get to a point where, after spending several days doing the shopping and the driving and the emailing I need to sit down and make something- even if it's something small. 

Sunday, April 20, 2014

Fake Quiche

For the upcoming production of Five Lesbians Eating a Quiche, I needed quiche (obviously), a LOT of it. 

I started picking up pie plates at thrift stores as soon as I agreed to do the show. Within the show itself I needed about a dozen quiches, but the company also was very interested in having lots of quiche in the lobby as the audience is entering. 

It was decided I would aim for 50 quiches, so I set to work. 

I mixed up salt dough for the crusts. To save a bit of mess (as the flour tends to get everywhere) I mixed the dough in the sink. 
Then I pressed the dough into the pie pans. For clear glass dishes I had to make a full crust, but for the metal or ceramic dishes I could get away with just doing the sides. 
 To bake the crusts I preheated the oven to 400 degrees, put in the pans, then turned off the oven and left the pies in there for the rest of the day. This didn't all happen in one day, by the way. I made crusts every morning for a few days, then cycled through the steps as each quiche was ready. 
 Once the crusts were baked, I filled them with great-stuff expanding foam. 
 After the foam hardened and cured, I carved off anything that had expanded above the top of the crust

 I learned as I went that it works best to have an uneven surface on top, with all of the foam stopping about a quarter inch lower than the top of the crust. 


 My plan was to melt down wax, add yellow dye and pour it on top to finish the quiches. My first attempts didn't turn out as planed though. They looked too yellow, and the wax was too translucent. I ended up buying opaque taper candles from the dollar store to mix in with my bulk craft wax in order to get the opacity correct. 
 Wax can be tricky to judge because, when it melts, it is all transparent. It is hard to know what the color will look like once everything hardens and become whiter and more opaque. 
 After everything was melted down, I poured the wax over the great stuff, and then left it to cool. 
 Here are the same two quiches after the wax cooled. 
 The color is close to right, but the texture is all wrong. 
 Since the color was right I decided to start experimenting with fillings. I collected spare bits of past projects from my craft closet and set to work. 
 The first try was with these multi-colored pom-pom balls. I spread them over the foam, 
Then poured the wax on top. 
Once the wax cured, it looked like this. Better than the plain ones, but the texture was still not right, and it was too obvious what the pom-poms were. 

I ended up spooning a bit more hot wax onto the top of the quiche. I then strategically pressed it, piled it and moved it with my spoon until it dried, leaving a much more convincing texture, and obscuring the obvious shape of the pom-poms. 
 I tried again with bits of red pipe cleaner


 leftover fake leaves


 and rice- not my favorite


 And here are some of the results.
This is my first batch of 16, so I'm sure as I go forward they will get even better, and hopefully I'll find other filling options that give more interesting variety to the collection (I'm definitely want to try sprinkling the tops of some with real herbs while the wax is still hot). 

Tuesday, April 15, 2014

Meat Dome

Today I learned that this...

is called a "meat dome" which is why my searches for "covered silver tray" and other variations of those terms, were coming up empty.

I also learned that they are VERY expensive, and I will be making one instead of purchasing one.

Bundt Cake

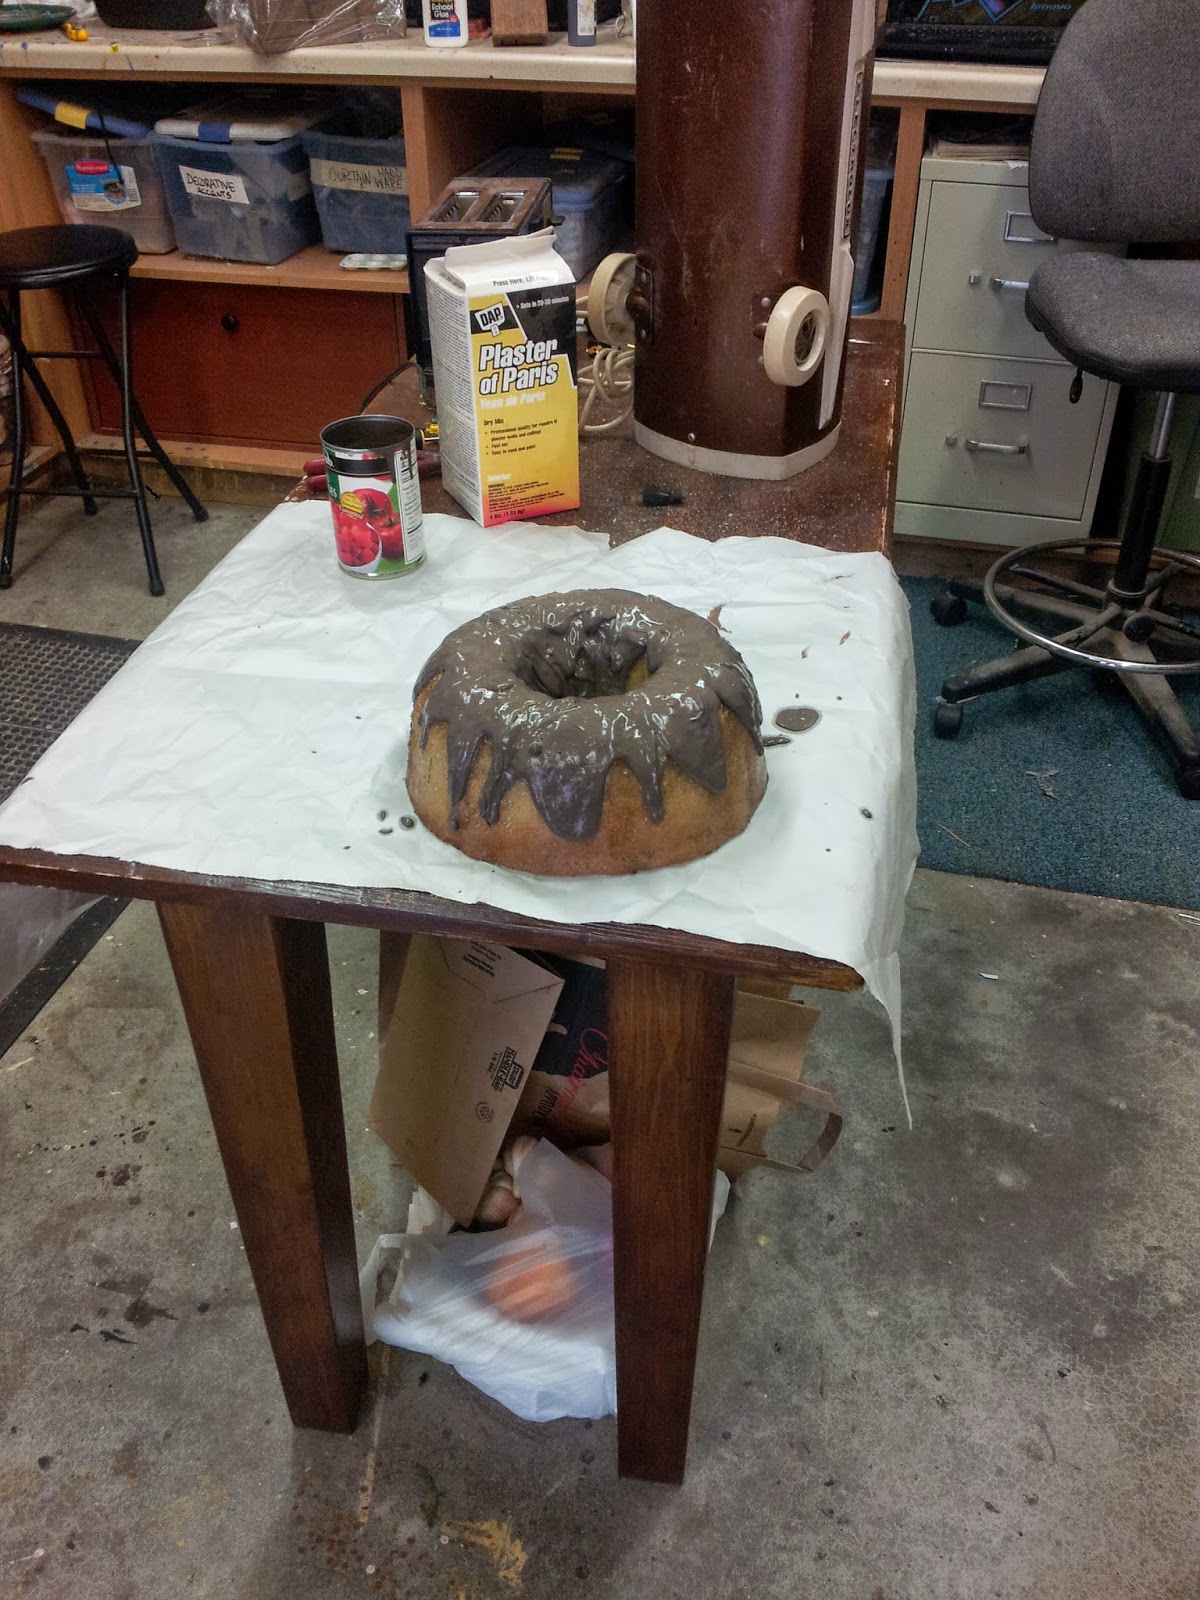
I made this cake last summer for Miracle on South Division Street at Peninsula Players. I just noticed the photos still on my phone and realized it never made it onto the blog.

I puchased an nice bundt pan for the show to use as set dressing. As a bonus I was able to use the cheap plastic liner for this project. We filled the liner with great-stuff and let it expand overnight. It expanded to overfill the liner, but the foam at the very bottom of the mold (the top of the cake) hadn't cured because no air could get to it.

We removed the cake from the liner, cut off the over-expanded bottom of the cake so it would sit flat, and allowed the top to finish curing. Since it was no longer curing inside a mold the top became a bit more uneven and bubbly, which didn't particularly matter for this project, but is good to remember for next time.

I sprayed the cake with some glossy wood tone for color.
After the paint was dry, I mixed some plaster of paris with brown paint to make an icing. Once the plaster had hit the right consistancy, I carefully poured it over the cake, allowing it to drip down the sides. 
 It looked great initially, but after the plaster cured, the plaster looked dull and dry. 

 I added a final coat of clear gloss sealer to the icing to get the final look. 

Thursday, April 10, 2014

A Day in the Life of a Freelance Prop Master- April 8, 2014

It occurred to me yesterday, that while I regularly post about individual projects, I don't regularly post about how I do my work on a daily basis. So yesterday I decided to keep track of everything I did (on a particularly busy, interesting day).
9:00 am- I am working on a big fake food project for my next show, Five Lesbians Eating a Quiche, for which I need 60-80 fake quiches. Since they need to bake, take time to bake, and take up room in the oven, I am trying to do a few every morning. I mixed up some salt dough for the crusts, preheated to oven to 400 degrees, pressed the dough into the pie pans, put them in the oven, and then turned off the oven, closed the door and left them. 

9:30 am- with the quiches all set, I got on my computer to respond to emails, enter in receipts from the past days, put some meetings onto my calendar etc. 
10:00 am- Still on my computer at home, I switched to craigslist to do an initial search for some furniture pieces for Five Lesbians.

 11:00 am- Ten minutes after getting out the door, I stopped by the Jewel (grocery store). I picked up more salt and flour for salt-dough crusts, some eggs for another project (more on that later), and a muffin and some milk for my breakfast (No worries Mom, I pulled over to take this pic).
 11:30 am- I arrived at Michaels. I picked up wax and Model Magic for the quiches, and some egg decor items for the same show. 
 12:00 pm- I went to the Greenhouse Theatre. The building houses four theatres, which are rented out by different companies. I happen to be working on two shows, for different theatre companies, that are both in the Greenhouse right now.
 First, I went upstairs to finish the last note I have on Cicada with Route 66 Theatre Company. There is a scene in the show where a character has been ironing. We needed 10 starched, ironed white collared shirts. The shirts were provided by costumes, because she was being helpful, but starching and ironing them was my job. I did 6 of the shirts the day before, but had to leave to get to another appointment before finishing, so I was back to finish the last 4.
 1:00 pm- After finishing the shirts, and discovering a new respect for wardrobe people, I went downstairs to take care of a last note for Our Class. The show was open, but I had gotten a note from the ASM that the leather on this reinforced suitcase was starting to give. There is a simple wood frame installed inside the suitcase to make it sit-able. I added a few screws to attach the leather case to the wood frame, so it stopped pulling away in strange ways when the case was lifted.
 1:45 pm- After leaving the Greenhouse I headed north toward my 3pm American Dead meeting in Evanston. On the way I stopped into the Good Deal Garage. I wanted to have a few more rehearsal props to drop off at my 5 Lesbians meeting tonight, and knew that they would have the frames I needed for a decent price. I paid, and was out the door in 15 minutes.
 2:00 pm- As I continued up to the Northwestern campus in Evanston I kept an eye out for somewhere to stop for lunch. Hoosier Mama Pie shop was on the way, and I had heard good things about it. I stopped for a rootbeer and a slice of pork-apple-sage savory pie.
 2:50 pm- I arrived a bit early for my American Dead meeting, but found the set designer and director already there. We discussed the layout of the space a bit, and then talked through the rest of the show with the master electrician, production manager and costume designer once they arrived.

4:30 pm- After leaving the meeting, I headed home (and this is when I stopped remembering to take pics...sorry). I stopped by a Salvation Army that was on my route. I was able to find a few more pie plates, and I also picked up an old sauce pan.

5:00 pm- I unloaded some of the days purchases from my car, quickly melted some wax and went to work on quiches. I wanted to have some samples of options ready for the my 6 pm meeting. I was able to pour a yellow wax filling into 2 quiche dishes, and to form the model magic into 4 crusts. As soon as the wax was set, I packed up what I could and was out the door.

6:00 pm- Luckily, the 5 Lesbians meetings take place only 5 minutes from my house. The one hour meeting ended up being mostly about set dressing, props and special effects, so while I felt bad about taking up other people's time, I got lots of important answers to my questions.

7:15 pm- From the meeting I headed back down to the Greenhouse for final dress rehearsal of Cicada. On the way, I stopped by the same Jewel to get more starch for the shirts. I had just enough of the starch I purchased previously to do all ten shirts, but wanted to make sure the ASM had some to touch up the shirts if he needed to during the run. I also picked up a plate of to-go sushi for dinner (it wasn't very good).

7:30 pm- I arrived at final dress a bit late, and snuck in quietly to take a seat in the dark. I took a few notes during the show, but mostly everything was in good shape.

8:30 pm- After the run ended, there was a photo call with the cast onstage, and the production team talked through tech notes, and then we were done.

10:00 pm- I arrived back at home after a long day. I still had those eggs sitting out on the counter though and Warwick, my husband, was showering and shaving. So while I waited for him I decided to get one more note done.
In Pinkolandia, about to open at 16th Street Theatre, I needed 3 hollowed out eggs nightly. I poked holes in them with the end of my beater and then blew out the insides. I did about a dozen eggs, and then was done for the night.

Wednesday, April 9, 2014

Greenware breakable dishes

It is an old theatrical trick to use "greenware" when plates or other dishes need to be broken onstage. Greenware is essentially un-fired pottery.

I had a bit of trouble tracking some down in Chicago, but was eventually able to speak to a manager of a "paint your own pattery" store, who was able to order them directly from his supplier when he went out for his weekly pickup. I needed enough mugs, plates and bowls to smash one set every show for ten runs (Four perfomances, plus 6 rehearsals).
I was able to get the pieces for $3 each, which was about what I was expecting. For a long running show, this would have been a serious portion of my budget, but for this short run, the price was reasonable.  
It did take much longer than expected to track down the pieces and then to get them from the supplier. Next time I will already have made the contact (if I am here in the city) but I still will make sure to start the process from the moment I have a hint of needing breakable objects, to make sure we have them in plenty of time.
Once we determined that the pieces worked during tech, the biggest problem was that they seemed obvious. As soon as the actor picked up the dish of the shelf you could guess he was going to break it. The simple grey color was begging to be smashed. So we decided to add a pattern. The first thing I tried were some wide artist's markers, but the not-quite-dry clay soaked up the ink, dried out the markers and gummed up the tips. It looked great, but was time consuming and wasteful of the nice markers. 
 I took a trip to Blick Art supplies to find a solution, and the man there recommended I try oil pastels. They worked perfectly. I was able to trace lines smoothly and quickly on the surface of the dishes, and a coat of spray sealer over each dish kept the pastel from rubbing off when I was finished. 
 Best of all, the design achieved the desired effect. From a distance the dishes looked so nicely designed that seeing them smashed was much more shocking. 
 I have very few photos of the smashed dishes. They crumble easily (which is the point), but since the scene continued with 20 more minutes of very physical comedy after the plates were smashed, the pieces onstage were basically dust by the time we hit a break. 
This photo shows the sharpest point I could find on the smashed plate I was able to photograph. I was able to run my finger back and forth across this point without any pain. In fact, the only damage done by rubbing my finger across it, was to the plate, which became more worn down and rounded each time I dragged my finger across. 

One safety concern we did have to consider, as actors continued to walk back and forth on the smashed dishes in the scene, the dust go on their shoes. They tracked that dust around the stage, which caused things to get very slick and slippery. Once we realized the problem, we were able to mostly guard against it, and the stage crew made sure to be extra diligent when they cleaned at intermission, but it is something to be aware of and plan for if you can.