Saturday, February 15, 2014

Decapitated Head

I tried a version of this project 4 years ago, when I was just starting out doing props. It didn't turn out very well. 
The idea was to find a cheap and durable item to serve as a decapitated head. We didn't need a realistic face or hair, as the head would be wrapped in a bloody cloth. We just needed believable shape and weight. 
The first time, I started with a base of a hard rubber ball, then tried to sculpt the face around it. I think I ended up getting the shape close to right, but the weight was all wrong. The way the head moved and swayed in the hand of the actor revealed immediately that it was too light, and therefor clearly fake. 
This time, I again planned to use masking tape to do the sculpting, but instead of the rubber ball, I started with a 5lb bag of sugar as my base. In addition to the weight, it had the added benefit of already being larger and a more oblong head-shape, which saved me some work in building up bulk. 
I covered the bag of sugar with an initial layer of the masking tape, to make sure the sugar was sealed and prevent me from accidentally causing a tear in the bag while I was working on it. 
Sculpting with masking tape is done by creating long twisted strands. I tear of a long piece, stick the other end to a table, then proceed to twist the tape, sticky side out, in to a long rope. 
The ropes have far more bulk that just a single layer of tape would. I layer the tape ropes, first all over to round out the base shape, 
And then gradually in a more deliberate manner to sculpt the face. 
Until I have something that I think will be believable. 
Once the head is completely sculpted, it needs the final finish. 
A couple layers of masking tape stuck flat and face down creates a nice smooth skin.

I meant to finish this post with a photo of the head, wrapped in the bloody cloth, but I never managed to get a photo of it. I am pleased to say though that it was a success. Just before the head was brought onstage, the ASM dipped it into a bowl of watered down stage blood. It was gruesomely effective as the actor hoisted the head in the air and we could see the blood dripping down onto the stage.

To keep everything in good shape, the ASM wiped the head down nightly so none of the blood dried onto it, and the bloody cloth was put in with the laundry, to make sure it didn't get crusty. 


Thursday, February 13, 2014

Wooden Rock

I have some pretty cool projects coming up from Lifeline's production of A Tale of Two Cities. This first simple one only took about an hour, and turned out very well. I'll probably use this trick again. 
I needed a large rock that would be used, by an actor, to hit another actor on the head and knock him out. The moment was well choreographed stage violence, so the rock never really comes in contact with the actor's head. Still a real rock would have been heavy, dangerous, and harder to control. 
After the hit happens, the rock is dropped onto the wooden deck where the actors are standing. The fake rock needed to be hard and dense enough to make a convincing noise when dropped. 

I decided the use a similar solution to the one I used for the axe a few months ago. I decided to create the rock from a large piece of wood. 
 I found this 4x4x6" piece in the scrap bin in the shop. 
 I started by taking it to the chop saw. I set a 45 degree angle and began cutting off corners to give myself a rough shape. I twisted and turned the block until I had made a cut on every square edge I could (as soon as I could no longer safely and firmly hold a flat edge against the fence while I cut, I stopped). 
 After the chop saw I took my rough-cut-crystal-looking piece of wood to the belt sander. 
 I used the flat part of the belt sander to round over all the hard edges and then used the rounded end of the sander to introduce new ridges and divots, trying to remove all flat and smooth surfaces. 
 After getting approval from the director on the size and shape. I took it to paint. 
 A first coat of brown paint provided the base, 
Then an uneven dusting of grey spray paint gave it texture.  
 The final piece is large enough to appear dangerous, easily gripped, light enough to be well controlled by the actor, but heavy and solid enough to provide a convincing sound when dropped. 

Sunday, December 15, 2013

Never be afraid to ask...for WAY more than you can afford

An Inspector Calls at Remy Bumppo, turned out beautifully, with a huge beautiful oriental rug and beautifully finished wood furniture. 
When we started work on the show, and the set designer sent me research with images of the type of furniture he was imagining, I was worried. I knew my budget was not enough to be able to purchase anything. 
 Then, when I discovered that none of my go-to rental sources had anything, I was even more worried. 
 I hoped that I would find someone on craigslist selling something beat-up that I could repair, or something they didn't know the value of. But after weeks of looking I had nothing.
 While out running other errands in the city, I drove past an antique store that I hadn't been in for years. I had long ago ruled it out as being more expensive that I could afford on any of my budgets. I figured it couldn't hurt to stop in, and I was desperate. 
 Walking into the store I immediately knew I had to find a way to work with them. The furniture in the store was right out of the research images. 
 I approached the owner and told him the situation. I had $X to spend and knew that was far less than he should charge me for a rental of all the pieces I wanted. I could offer him comp tickets to see the show and an insert ad in the program (with a guesstimated value of $X, which would be seen by approximately X number of people). I would take responsibility for the safety of the items while they were in the theater's possession, and the show itself is fairly tame, no large fights, no one treating the furniture roughly etc.
 I was also able to provide him with a copy of the company's insurance policy, to assure him that, should some unforeseen incident harm his pieces, we would be able to compensate him. 
 He agreed to the rental and we have a beautiful dining room set with a table, six chairs, two beautiful gold mirrors, an overhead light fixture, and buffet and a marble top server for exactly what I had in the budget. 
 As precautions to preserve the condition of the furniture, we made sure to tell the cast and the set construction crew that it was rented and valuable, so that they take extra care with it. I have also given the ASM some nice furniture polish and rags. Every evening after the performance she wipes off and polishes the top of the dining table, to make sure no drops of liquid from the show are left on it, and to keep it in beautiful condition. 

Tuesday, December 10, 2013

Scraps of dessert

For An Inspector Calls at Remy Bumppo, the show opens at the end of a dinner party. The characters are supposed to be finishing last bites of dessert as the maid cleans the plates and dishes away. I made these quick plates of lemon cake and custard from upholstery foam and wax. 
 I tore very small bits of upholstery foam from a block I had, 
 I arranged the bits onto plates and then poured a bit of wax that I dyed to look like custard over each piece. 
In addition to creating a nice appearance of sauce, the wax served as the adhesive to attach the foam to the plates.
We purchased one small loaf of lemon cake at the grocery store. We will slice the cake and freeze it. Each week the stage manager will thaw a slice of cake and put one bite onto one of the plates so that one of our characters can have a real piece of cake on her fork to eat before the plates are taken away.

Thursday, December 5, 2013

Newspaper with inserted articles

Period newspaper props are getting more and more difficult passing year. As color ink gets cheaper and more common, it is harder and harder to find generic newspapers without large color photos or ads. At one point I could just remove the cover pages as interior pages rarely had color, then the color spread to those pages too. Just recently, my go-to generic newspaper, the Wall Street Journal started printing with color ads and photos on all the pages.
It is also difficult to print your own newspaper. You need a large format printer, and many print shops will refuse the hastle of printing onto newsprint, even if you bring the paper in yourself. It gets tangled and jammed in the printers easily because the paper is so thin.
For newspaper props that don't take a lot of wear and tear, this is my solution.
 I start with a small drawing pad of newsprint. I bought this one several years ago and it has lasted me through multiple projects.
 The pad is 9x12, so each sheet needs to be cut to 8.5 x11 to fit into my home printer.
 I pull images offline and type out a few headlines,
 Then glue the articles and headlines into my purchased newspaper to cover up the color photos.On this one I added the photo of the Titanic, the headline about war, and the small section of a period newspaper under the photo (to cover the larger photo on the page).
Since newsprint is so thin, the extra layer of print tends to blend seamlessly into the base paper and not cause too much stiffness. 
This is easier to do if you buy the paper you are going to be gluing into first, then you can measure the areas you are going to need to cover and format your images and text columns to fit. 

Saturday, November 30, 2013

knotted lamb and baby

For Paulus, at Silk Road Rising, the concept of the show was very theatrical. We felt specifically that two props, a dead baby, and a sacrificial lamb, would be far more effected if we abstracted them from the draped fabric world of the costumes, than if we were to try to create something totally realistic. 
Unfortunately I took far fewer photos of the process than I meant to, but the ones I have here should give a good basic idea of what we did. 
The first step in something like this is to create a skeleton. We wanted to props to be limp and floppy, but if they had been all fabric, the form would have easily been lost, and the effect wouldn't work. I looked up research images of lamb and human skeletons and cut dowel rods to match some basic skeletal structure. I glued the dowel rod to clothesline, with gaps at the joints to allow free movement at those places. 
Next the skeletons were wrapped in a base layer of fabric to hide out structure. I tied shorter knotted pieces at certain joints to prevent them from extending too far in unnatural directions (like tendons). 
Here you can see how a lamb leg is tied with tendons so it holds the shape of an actual lamb leg, with joints bending in the proper directions. 
Once the structure was in place, it became about tying and twisting many layers of fabric in order to fill out the bodies, and blend them with the world of the costumes. This is roughly what the final baby looked like. 
And here is the sacrifical lamb, lashed to a pole to be taken into the temple. The lamb was intended to be all white initially, but didn't look right. The addition of the strips of burlap added definition to the shape and had the added benefit of tying the lamb into the world of the set. 

Monday, November 25, 2013

Some things are worth paying more for: Percussion


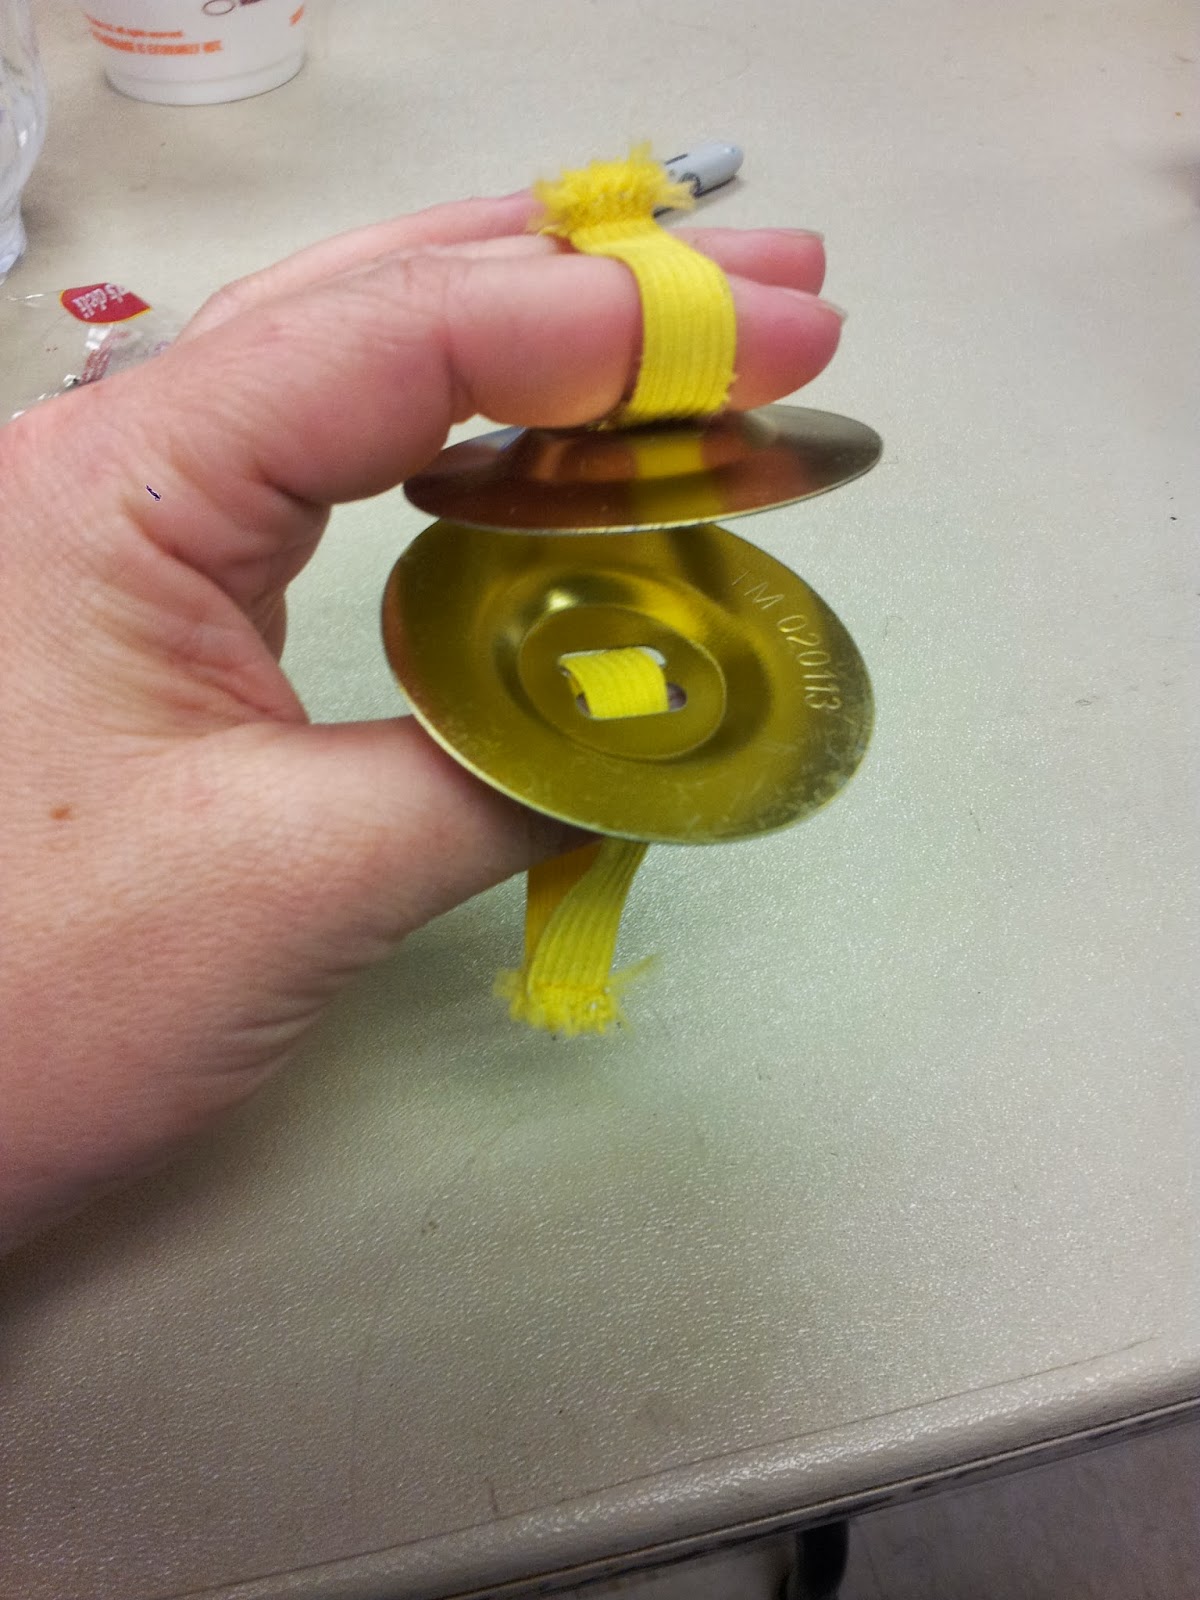
For Paulus at Silk Road Rising, the director had an idea to create a theatrical moment out of falling coins with actors in the wings using finger cymbols. He sent me an email suggesting it late in the rehearsal process and included a link to a novelty site where some could be purchased for $1.25 each. 
 I placed the order, and they showed up looking like this, and sounded exactly as bad as they should have for the price.
No matter how we tried, we couldn't get the cheap flat metal to make anything resembling the nice loud ring we were imagining. 

 After crunching some budget numbers I decided to give up the cheap cymbals as money gone and lesson learned. I purchased these real finger cymbals at a local music store. They were $20 for 2 pairs, 10x the amount of the cheap ones, but worth every penny in making an effective theatrical moment. 

Wednesday, November 20, 2013

Barbed Wire Crown

For Paulus at Silk Road Rising, we needed a barbed wire crown to put onto one of the actors. It was supposed to be very similar to the biblical crown of thorns. I first tried to make the crown out of twisted wire, with twisted and hand-cut barbs hot glued to it. I didn't like the outcome. I was able to glue the barbs in place so that they were all pointed away from the actors head, and to round the ends of them a bit, but they still seemed dangerous. If any of the barbs came loose from the glue, the actor was in danger of the barb twisting and scratching his head. 
The tech director on the show told me that he had seen barbed wire made before with rubber barbs. I found this website, which seems to make it their specialty http://www.actionprops.com/catalog/item/2278608/1717355.htm, but it was a bit expensive, and also a bit late in the process to be ordering something and waiting for shipping. 
I decided to try to make it myself. 
I found these rubber necklaces at Michael's. 
 I cut them into pieces about three inches long and then tied them onto the twisted wire crown I had created for a rehearsal prop. 
 The rubber allowed the actors to be safer when handling the prop, while I was able to make it look more dangerous. I cut the tips of each rubber barb at a steep angle to make them appear sharp, and was able to allow the barbs to point in all directions, instead of all needing to point deliberately out. 
A quick coat of silver paint resulted in a very convincing looking "crown of thorns". The only problem I have run into is that, since the rubber barbs can bend and flex, the silver paint slowly cracks and flakes off. It needs to be touched up once in a while, but that is something I can do quickly when I stop by the theatre.