Tuesday, April 1, 2014

Liverwurst

After having success using modeling clay to make slice-able cheese and sausage last summer, I was excited to try it again for the liverwurst in The Suicide. 
This time the sausage didn't need to be sliced, but it did need to be used for all sorts of "bits" in this very physical comedy. The clay gave the liverwurst a very believable weight without it being dangerous to hit someone with, gently, in scene. 
It was rigid enough to be used as a fake gun in someone's pocket, and could be molded and manipulated by the actors for an endless number of phallic jokes.

The clay did get a bit dirty by the end of rehearsals and the run (which was only one weekend because this was a college show). For a longer run I would have needed to be prepared with backups. 


Sunday, March 30, 2014

Cheap Floral Wreaths

Fake flowers are expensive. Often not as expensive as real flowers, but still not cheap.

*Side note: I learned a while back that not everyone knows the dollar store sells fake floral. It might need some extra glue because the flowers like to fall off their stems, and you'll likely want to fill out your arrangement with some higher quality fake flowers, but for bulk fake floral, the price can't be beat.

I was lucky when working on The Suicide at Roosevelt University, that there was already a stock of flowers and greenery to pull from, but I still needed six wreaths to create my arrangements. The foam wreath forms at the craft store were small and expensive. But these basic wire boxwood wreath forms were cheap and just the right size.
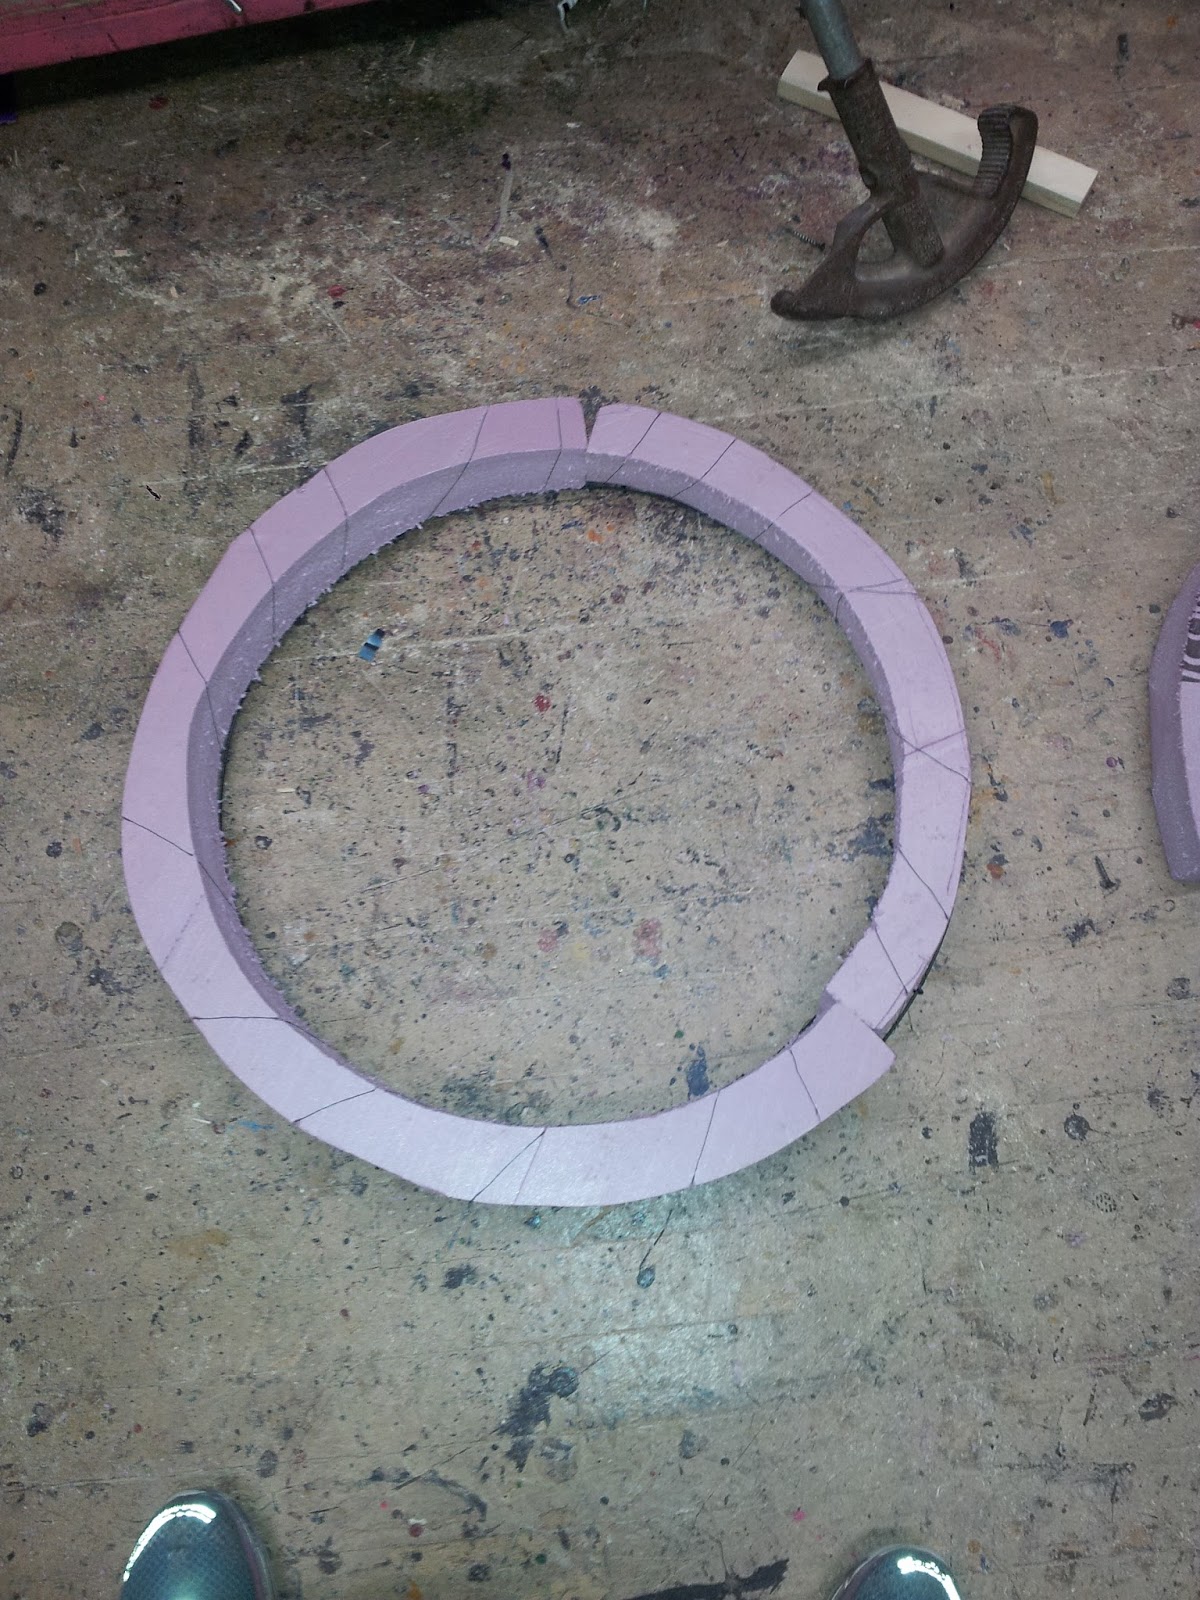
I traced the wire form onto some 1.5" scraps of pink foam, and cut out the foam pieces with a jigsaw. 

 Then I used floral wire to wire the foam onto the form. You can see in this photo that my pieces of foam didn't always fit exactly, but under all the layers and flowers, small inconsistencies like this disappeared.
 and here is a view of the same wiring from the back side. 
 Some of the wreath forms I left pink, and just started adding flowers. On others, like this one, I wrapped the wreath in colored tissue paper and tulle first. The Tissue paper and tulle was thin enough that the wire stems of the flowers could poke right through, and into the foam without much effort. 
 The floral arranging itself was mostly just about finding enough flowers in the right color family to fill the space. 
And here are some of the finished wreaths (we ended up making four and pulling 2 from stock). 


Thursday, March 27, 2014

"Period appropriate" is relative


This last, overdue, post on A Tale of Two Cities at Lifeline Theatre is in not about anything I made. All of this glassware was purchased or pulled from stock.
The interesting challenge here was that the show took place in so many different locations. The disparities between those with money and without is also a huge theme in the show. I needed to have people drinking wine in four different scenes, in four different locations. 
Starting with the richest character in the richest setting, I used cut glass (meant to look like crystal) for the Marquis St Evremonde. Glasses like these would have been a more recent innovation at the time of the show, and only the rich would have owned it. 
One step below the Marquis, would be the Mannettes. I was thrilled to find these etched glasses at a local rental shop. They almost exactly matched some antique period glasses I had in my research. The ones at the time would have been a thicker glass, and not as perfectly matched (as they would have been hand-blown). Not as nice as the crystal, but solidly upper middle-class. 
Next came glasses at the English pub. I wanted to convey that this was a fairly nice place, but logically could not image any pub at the time using hand blown glass wine glasses. That would be far to expensive to purchase in bulk, in a place where they are likely to get broken. I knew found the right balance when I found these glasses made of brown glazed ceramic.  
And finally, the lowest class glasses would have been in the Defarge wine shop. They sold cheap wine to the poorest villagers in their suburb of Paris. The glasses in that shop only needed to be functional, cheap, and easy to replace. These clay mugs were the perfect solution. 
Working through these different wine glasses served as a good reminder of the importance of research. It can be very easy, especially when working on shows set further in the past, to find one or two images research images and move on; "That is what wine glasses looked like in 1790." But class, region and wealth also need to be factored in. 


Tuesday, February 25, 2014

Doug the Dummy

In A Tale of Two Cities, a young boy is supposed to be run down by a carriage and killed in the street. We couldn't cast a seven year old boy to just lay and pretend to be dead nightly. A dummy was needed, and it needed to be good. My cheap duct-tape dummies can be good when no one moves them, but this needed to be carried in and out realistically. When in someone's arms it needed flop convincingly and be articulated correctly.
 I started by building a wooden skeleton. To get the proportions right I measured my own body and then took two-thirds of each measurement (I figure a seven-year-old boy is about two-thirds my size).


For the elbow and knee joints I used small hinges. 
For neck, shoulder, hip and wrist joints I used an screw-eye in each side, and a S-hook between to get a more random natural movement. 
Late in the process I had to go back to these joints to wrap them in strips of muslin. Doug was looking pretty great in rehearsals, but the metallic clicking of these joints completely ruined the illusion. Wrapping the joints allowed them to keep their free natural movement, but muffled the sound considerably. 
Once all the joints were attached together, I started adding some muscle and flesh. I cut strips of quilt batting and wrapped them around each part of his body. 


Once I had added enough batting to fill out the shape I started adding clothing. The costumes department was kind enough to loan me some pieces that they didn't end up using.
We tried to stage the scene so that Doug's face would be hidden as much as possible, but he still needed to have something in case the audience got a glimpse of him. 
At a local costumes store, I bought the cheapest wig I could find, a cheap mask, and a pair of nylons. I attached the mask to Doug's head then pulled the nylons over his whole head. The nylons give the skin a much more natural look than the clearly plastic mask, and help smooth the transition between the mask and the rest of the head. 
And here is Doug fully dressed. He looks pretty convincing in person, and has certainly startled some of the theatre staff when they walk backstage. 


Thursday, February 20, 2014

Madame Defarge's Knitting

In A Tale of Two Cites, the "villain" Madame Defarge is continually knitting. Her knitting project, we discover, is a coded list of all the people who need to die when the revolution happens. Our production takes place over the course of several years, so we needed several pieces of knitting to make it appear that she has been making progress (after this photo was taken, the long piece got several inches longer). We tracked the knitting throughout the show and determined that it needed to make four appearances. Three times she would be working on the knitting, and once, after the revolution had begun, the knitting would be off the needles as a "finished" list. 
To save myself a LOT of knitting, I decided to find a way to make the long "working" knitting the same as the knitting off the needles. Unfortunately, with knitting, pulling the project off the needles and then putting it back on is not an option. I proposed that we do something similar to the reusable knitting I created several years ago for Goodnight Moon. I carefully knotted in small red rubberbands as I was casting off to finish the knitting. As you can see, it was possible to continue knitting normally through the red bands. This allowed our actress to knit normally through the final scene when she needed to do so. At intermission the ASM was able to pull the project off the needles and unravel it back to the permanent row of rubberbands. This process can be repeated for each show without ever damaging the knitting. 
For the knitting itself, I did quite a bit of research to find the right pattern. Much of what I saw was either too patterned (I didn't believe there was a code in it that said different things), too random (with so many different colors and patterns I couldn't believe anyone could decode it), or way too obvious (if you are knitting visible letters, it's not a very good code)
Eventually I came across a knitting code that made perfect sense. It broke down each letter of the alphabet as a distinct set of three stitches, and suggested including rows of uniform stitches in between to set off the code. 
You can find a link to the entire document here
Neither of these photos captures it as well as I would like, but they can give you a bit of an idea of how the pattern worked. When looking at the knitting from far away, there are clearly irregular rows and regular rows. Closer audience members might be able to see all the small holes and skipped stitches that make up the pattern. 
This project took me many hours, but was one that allowed me to overlap work and down-time. For about a month I brought it with me wherever I went, kept a printed copy of the code with me, worked while watching tv at night and while waiting at the airport for a family vacation. 
It is also worth noting that I barely knew how to knit when I started this project. In order to learn the stitches in the code I spent quite a bit of time looking up tutorials and youtube videos of each stitch that I needed. By the end of the third piece of knitting I was moving five times faster than when I started. I am confident that the next time knitting comes up in a show I will be able to create something with more detail, and with much more speed. 

Saturday, February 15, 2014

Decapitated Head

I tried a version of this project 4 years ago, when I was just starting out doing props. It didn't turn out very well. 
The idea was to find a cheap and durable item to serve as a decapitated head. We didn't need a realistic face or hair, as the head would be wrapped in a bloody cloth. We just needed believable shape and weight. 
The first time, I started with a base of a hard rubber ball, then tried to sculpt the face around it. I think I ended up getting the shape close to right, but the weight was all wrong. The way the head moved and swayed in the hand of the actor revealed immediately that it was too light, and therefor clearly fake. 
This time, I again planned to use masking tape to do the sculpting, but instead of the rubber ball, I started with a 5lb bag of sugar as my base. In addition to the weight, it had the added benefit of already being larger and a more oblong head-shape, which saved me some work in building up bulk. 
I covered the bag of sugar with an initial layer of the masking tape, to make sure the sugar was sealed and prevent me from accidentally causing a tear in the bag while I was working on it. 
Sculpting with masking tape is done by creating long twisted strands. I tear of a long piece, stick the other end to a table, then proceed to twist the tape, sticky side out, in to a long rope. 
The ropes have far more bulk that just a single layer of tape would. I layer the tape ropes, first all over to round out the base shape, 
And then gradually in a more deliberate manner to sculpt the face. 
Until I have something that I think will be believable. 
Once the head is completely sculpted, it needs the final finish. 
A couple layers of masking tape stuck flat and face down creates a nice smooth skin.

I meant to finish this post with a photo of the head, wrapped in the bloody cloth, but I never managed to get a photo of it. I am pleased to say though that it was a success. Just before the head was brought onstage, the ASM dipped it into a bowl of watered down stage blood. It was gruesomely effective as the actor hoisted the head in the air and we could see the blood dripping down onto the stage.

To keep everything in good shape, the ASM wiped the head down nightly so none of the blood dried onto it, and the bloody cloth was put in with the laundry, to make sure it didn't get crusty. 


Thursday, February 13, 2014

Wooden Rock

I have some pretty cool projects coming up from Lifeline's production of A Tale of Two Cities. This first simple one only took about an hour, and turned out very well. I'll probably use this trick again. 
I needed a large rock that would be used, by an actor, to hit another actor on the head and knock him out. The moment was well choreographed stage violence, so the rock never really comes in contact with the actor's head. Still a real rock would have been heavy, dangerous, and harder to control. 
After the hit happens, the rock is dropped onto the wooden deck where the actors are standing. The fake rock needed to be hard and dense enough to make a convincing noise when dropped. 

I decided the use a similar solution to the one I used for the axe a few months ago. I decided to create the rock from a large piece of wood. 
 I found this 4x4x6" piece in the scrap bin in the shop. 
 I started by taking it to the chop saw. I set a 45 degree angle and began cutting off corners to give myself a rough shape. I twisted and turned the block until I had made a cut on every square edge I could (as soon as I could no longer safely and firmly hold a flat edge against the fence while I cut, I stopped). 
 After the chop saw I took my rough-cut-crystal-looking piece of wood to the belt sander. 
 I used the flat part of the belt sander to round over all the hard edges and then used the rounded end of the sander to introduce new ridges and divots, trying to remove all flat and smooth surfaces. 
 After getting approval from the director on the size and shape. I took it to paint. 
 A first coat of brown paint provided the base, 
Then an uneven dusting of grey spray paint gave it texture.  
 The final piece is large enough to appear dangerous, easily gripped, light enough to be well controlled by the actor, but heavy and solid enough to provide a convincing sound when dropped.