Showing posts with label puppets. Show all posts

Friday, January 20, 2012

Independently controlled clock hands

Another post where the pictures are not as awesome as I would like (the next three or four might be like this) but the project was cool so I'm posting it anyway. 
This clock needed to have two independently controlled hands so that the time could be reset by the actor every few minutes (when he would pop through the face as a Cuckoo clock bird.
For the actor, we marked each time on the back and gave him an exact landing point for the wire he was moving (since he had no visual of the front of the clock).
The minute hand was attached to a 2" copper tube. On the front side this simply required a bit of glue, and a bit of gaff tape, to hold the foam-core clock hand to the tube. On the back side, to affix the wire the the actor manipulated to the tube, I needed to use JB weld (if you haven't used it before, JB weld is a two part adhesive designed specifically for attaching metals, it is available at most hardware stores and is amazing).

Once the hour hand was set, the minute hand was easy. I attached the hand on the front directly to my wire, fed the wire through the copper tube, and bent it over in the back to make it easy to turn.
While the back of the clock looks pretty silly when the hands started moving on the front of the clock it looked pretty magical. 

Tuesday, January 10, 2012

The Dish and the Spoon Puppets

I wish I had many more process shots of these puppets, but decided that it was worth sharing them anyway.
The dish and the spoon were mostly 2D puppets for Goodnight Moon. Part of the challenge was that they each needed to be easily operated with one hand, because the same actress was operating both puppets at the same time (in addition to playing a third character herself, quite a feat). To start I created a base shape for each puppet on a piece of 1/4" ply.
The mouth operated similar to the mouth of the parrot and the curious child that I built previously. The mechanism requires a plate on a pivot to function as the jaw, a string to pull the jaw down on the pivot, and a spring to pull it back up.
On the two previous projects, where I was creating mouths in heads that had dimension, I was able to attach the pivot point of the jaw somewhere inside the head. In this case, since my 2D puppet did not have a place like that, I used heavy gauge wire to create the fixed pivot. To attach the plywood of the jaw to the wire pivot I drilled a series of holes in the plywood and used another wire to create a series of loops (like a spiral notebook)
Once it was completed, the actor could easily operate the mouth with her thumb, while holding the spoon with one hand. 
To create the look of the front of the spoon, I first added a layer of foam board on the handle and around the face. In addition to giving the spoon some basic dimension, it also served to reinforce the plywood without adding almost any weight. I sculpted the rest of the dimension of her face with Crayola model magic. After the model magic was set, I took a large piece of stretchy lycra fabric and used it to skin the entire puppet. To attach the skin I used spray adhesive, spraying on bit at a time working from the most detailed portions of the face outward to the smooth edges. At the opening of the mouth I cut several slits in the fabric so that I could pull and attach the fabric to fit smoothly around the opening. Add some paint for red lips, pink cheeks and blue eyeshadow, some large googly eyes, and some pipe cleaner eyelashes, and she was ready to go.
The mechanism of the spoon started off in a very similar way, but the operation of the mechanism ended up being very different.
Since there was no way for the actor to hold the dish below the mouth, and be able to pull directly down, I had to use a series of eye hooks to move the strings to a place the actor would be able to access it. As you can see, my initial design had the actor holding the spoon by a handle, where her thumb would have been able to pull in on the string closest to the top.

In the end, she found it worked much better for her hand to be placed directly against the back of the spoon, and to pull up on the string by using a ring attached to her thumb.

To create the face, again I used foam core to create the basic dimension along the lip of the plate, then model magic to sculpt the face. I used a cream colored lycra to skin the plate, and then added a bit of paint, and of course the awesome felt mustache and uni-brow. 

Wednesday, November 30, 2011

The Red Balloon

 The red balloon was one of the trickiest pieces to figure out in Goodnight Moon. We wanted it to be able to move around the room, tip side to side, and move up and down. After some crazy ideas involving fishing poles rigged with right angles, tracks and pulleys running around over the set, etc. we realized the easiest solution was yo make the balloon a marionette operated from the catwalk. 
(Big shout out here to the run crew person who climbs the ladders, makes the balloon dance and then climbs  back down a dozen times per show). 
 The balloon itself is just thick paper mache formed around a large rubber playground ball. It has four screw eyes around the sides where the strings attach and are run to the grid. 
At the top of the strings is this this cross piece. Each arm corresponding to one side of the balloon. Instead of tying off at each point, I put an eye hook at each point and continued running each string through screw eyes, over the top of the crosspiece, and down to the handle where the operator will be holding the piece. 
 At the end of the handle all of the strings are run back to this fishing reel. The reel allows the puppeteer a wide range of up and down motion. Also, by counting turns she is able to hit designated heights consistently. 
 Hanging off the end of the crosspiece is this clip. The clip allows the puppeteer to clip into the grid where ever she is over the stage. The balloon clips into the grid, balances on the bar nearby and the puppeteer can leave it whenever she needs to to run downstairs to operate any of the other puppets. 


Friday, November 25, 2011

The cow jumps over the moon

By now it should be pretty clear that everything in Goodnight Moon moves or comes to life. The paintings are no different. For the cow jumping over the moon, we needed to cow to jump out of the frame three times and return again each time. 
this is the, terribly uninteresting view from the back side of the wall. Here you can see that the dowel attached to the cow is leaned against a piece of angled 1x2 and attached to the wall with a bolt. 
Jumping the cow out of the frame was just a matter of pivoting the dowel around the bolt.
We didn't want the cow to back up into the frame though, so once we got to this point we kept going until the dowel was pointing straight down. (it's hard to see in these pictures, but the 1x2 was attached to the back flat, and there was a gap between the 1x2 and the front flat the allowed the dowel to swing through). 
To get the cow back into the frame, the run crew uses the 1x2 as a guide to slide the cow smoothly into place. Once it is at the right height, they simply slip the pivot bolt back into its hole and the cow is ready to jump again.

The final time that the cow reappears in the frame, she has just successfully jumped over the moon and has been given a gold medal to celebrate her bravery. During previews several kids asked the director after the show why the cow didn't have her medal when she returned to the frame. Answer: because it hadn't even occurred to us. So after the show I whipped up this quick medal. 

I folded a piece of plumbers strap to fit over the cutout, covered it in white Gaff tape, with red and blue spike tape for stripes, and added a felt furniture glide painted gold. 
The piece slides easily over the cow's neck while the cow is out of the frame between scenes. 


Sunday, November 20, 2011

Dancing bookcase dolls

One of the more challenging and magical moments in Goodnight Moon, involved these dolls. 
Early in the show the dolls are taken off the bookcase and given to Little Bunny in his bed. About halfway through the show he places the dolls back on the shelf. Moments later the dolls magically start to move. 
To achieve the magic, both dolls were built with hooks coming out the bottom, that slipped into holes in the bookcase. 

As soon as they were placed on the bookcase, the run crew member backstage quickly attached hooks to the loops. 
To allow the space needed under the dolls, the majority of the books on this section of the bookcase were just bindings glued onto a piece of foam to hold them in place. 
The mechanisms within the dolls were difficult to photograph (pretty much impossible with all the fabric and stuffing surrounding the hardware). I figured a drawing might be an easier way to explain the way the dolls moved. 
The boy doll had wires in each arm The arm wires were attached to the wire going down through the bookcase, and a spring attached to the top of the dolls head. When the wire was pulled down it forced the arms up. When the wire was released the spring pulled the ends of the arm wires back and the arms went back down. 
What is not shown in the drawing is that the wire coming out the bottom is run though a piece of PVC to prevent it from getting snagged on anything. There are also too large dowel rods run from the seat of the doll all the way to the top of his head so that pulling the wire actually stretched the spring instead of just squishing the doll. 
The giraffe was rigged with a nodding head. A large trampoline spring was installed in his neck and heavy duty thread was sewn in from the font of his chin, though his body and down through his foot. when the wire was pulled from below, the spring was forced to bend and the giraffe nodded. When the wire released, the spring sprung back and the giraffe returned to it's initial position
I did have to insert some heavy bolts into the back legs of the giraffe to counter weight him. We were having problems with him tipping over when the string was pulled even slightly too hard. 

Thursday, November 10, 2011

Magic Phone


For the phone in Goodnight Moon, I started with this lampshade from IKEA. 
I cut out spaces at the top to provide a resting place for the receiver, cut out a space for the dial (which will later reveal a surprise face), and used a couple layers of duct tape to seal the top. 
 And a view from inside.
 To solidify the receiver cradle I used epoxy putty to fill in along each of the remaining prongs. 
 For the phone's first magic trick I wanted the receiver to jiggle when the phone rang. I used three L-irons and a small machine screw to make this tiny lever. 

 I installed the mini-lever on a small piece of plywood and screwed it into the phone.
 From the top the lever sits below the surface of the tape.
 Then when a string is pulled the L-iron pops up just enough to make the receiver jump a bit.

From below you can see that when you pull the string, the L-Iron pivots to pop up and stretches the spring
 When the string is released the spring pulls the L-Iron back into it's resting position.
For the phone's second trick, we wanted a face to be revealed when the phone spoke to bunny. 
 In resting position, all we see through the hole I cut is a standard phone dial.
 When a string is pulled from backstage the phone's face is revealed (I later changed the face to be much cuter than the one pictured here, which I was not at all happy with). In this picture you can see the springs that pull the panel with the dial on it back up when the string is released.
 This picture (awkwardly) shows how the panel with the dial painted on it disappears down below the phone, into a hole cut into the little bedside dresser.
And here is a view from above, looking down past the springs into the hole.
This project required a good deal of futzing to get to a point where the dial panel didn't get caught on anything on the way back up, and the string moved easily without friction from where the backstage crew was operating it. It also required a lot of rehearsal because the person who is pulling the strings backstage can't see what they are doing.*fingers crossed* it seems to be working well now.

Wednesday, October 5, 2011

Dancing Lamp

The exciting and challenging thing about "Goodnight Moon" is that the whole room comes to life. For me that meant that there are almost no simple props. Everything becomes a puppet on some level. 
This first puppet is the table lamp. 
For the base of the lamp I used a round globe lamp I found at Ikea. I removed the electric that were pre-attached and turned it upside down. 
I cut 2 circles of plywood to anchor the ends of the neck of the lamp. In between I attached a spring (mostly with epoxy putty), that could bend to make the lamp dance. 
I attached strings to the edges of the top plywood circle, ran them through holes in the bottom circle and out the bottom of the lamp. Once the lamp is installed onstage I will run the same strings through holes in the table, around pulleys and off-stage where they can be operated by one of the actors unseen. 
 To give the lamp a more solid base I cut a circle of foam core with a slit to fit the cable. Once I am installing the piece onstage, this will be covered in the same blue fabric as the rest of the lamp.
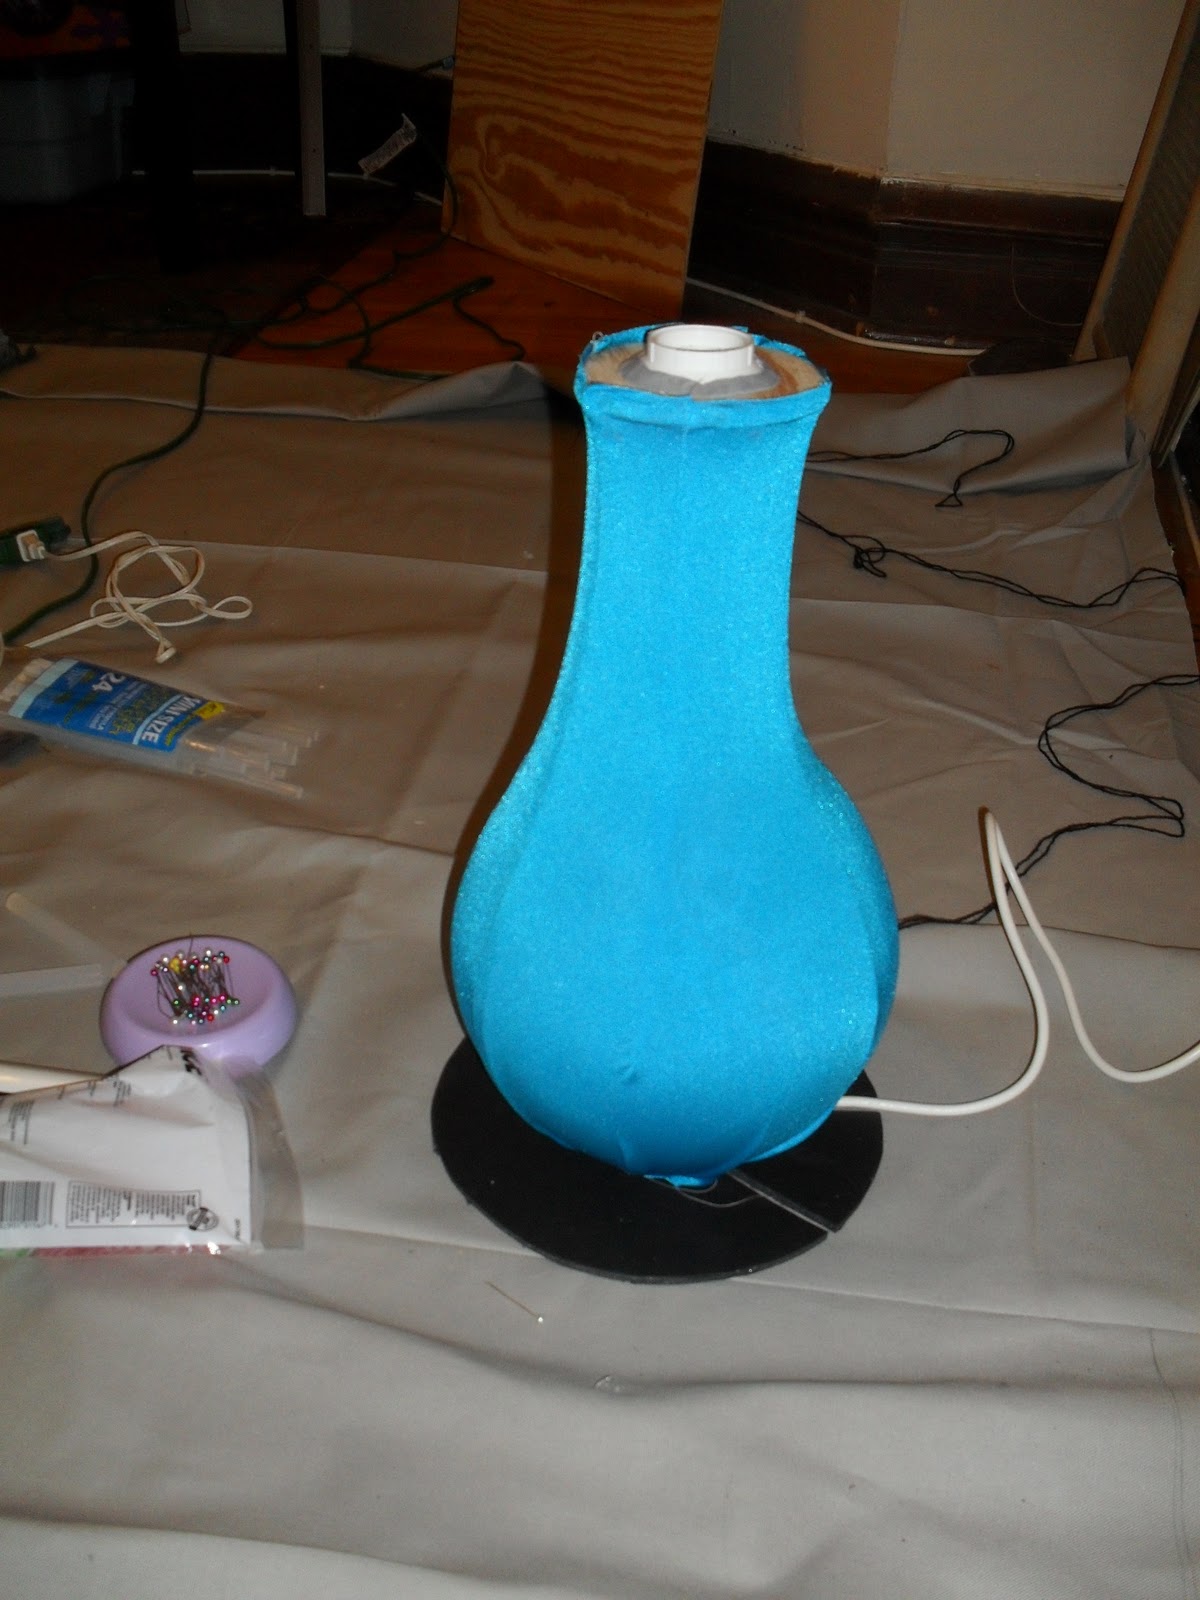
 Once the tipping mechanism was functioning, I needed to make the shell of the lamp. I used a stretch dance fabric so that I could get a smooth, wrinkle-free line while still getting the flexibility I needed.
I made the cover much the same way you would make a slip cover for a couch. I wrapped the fabric around the lamp base and then began pinning the excess fabric until it fit tightly. When I removed the fabric the pins gave me an exact pattern for where I needed to sew darts to make a perfect fit.
 I trimmed away all the excess fabric and turned the sleeve right-side-out.
 Then all I needed to do was pull the sleeve back over my lamp and hot glue it in place.
 I purchased a lampshade that is held in place by the lightbulb so that I didn't need any extra hardware for that.
Finally I painted the lampshade yellow and added some rick-rack around the edges so that I could get a perfect match to the lamp in the book.
Unfortunately the first time they tried to use the lamp in rehearsal, the line I was using for the pull strings broke. When I brought the lamp home to finish rigging I replaced the strings with thick wire.
finally I ran the pull wires, and the electrical cable through a piece of foam wrapped in my blue fabric, and through holes I had drilled in my table. From here I will run lines through pulley and screw eyes, once we load the piece onstage, to where ever they need to be backstage.