One of the board members at Oak Park Festival Theatre sent me an email the other day asking me if I could answer some questions so that she could write a bit about me for their company newsletter.
Here's the article she wrote with my answers-
http://oakparkfestival.com/she-gets-serious-props/
Thursday, August 14, 2014


Wednesday, August 13, 2014
Civil War Period Pen
Last week the stage manager for Butler at Peninsula Players Theatre asked me after rehearsal, "Greg wants to know if the General would be using a dip pen or a fountain pen." I started to answer and then realized, I had no idea. I told him I would do some research and then get back to them for rehearsal the next day.
In my research I discovered that the fountain pens that we know of today were patented in the 1880s, about 20 years after our play took place. Prior to that though, many companies were creating their own versions of something similar. Designs hadn't been perfected yet and could sometimes be leaky, or write a bit inconsistently, but people were using them. Based on this information I told stage management that the actor was free to make the choice himself.
He decided he would like to have a fountain pen, and then I set to work finding out what that would look like. As it turns out, examples of such pens are very hard to find. I ended up seeing three that all seemed to have this basic design. The body and the nib of the pen were very similar to a recognizable fountain pen (the first image has the nib removed). Then they have the long retracting plunger. It looks to me like this pen would be placed in a pot of ink, and then the plunger would be pulled back to draw the ink up into the reservoir.

m0!~~60_103.jpg)

I was excited about my new knowledge of period pens, but at a bit of a loss for how to make one (purchasing is not an option, the one pictured above is on sale on ebay for $2200)

When scouting around for materials I came across these cheap aluminum knitting needles. I was able to buy several sets in different sizes so I could experiment with one fitting snugly inside another. After cutting a few apart, I discovered this purple and gold combination was the best.

I cut the needles to the length I needed, leaving the end on the purple one.

I wrapped the end of the purple needle with just a bit of tape to ensure a snug fit.

We wanted to make sure that our pen was still functional, so I took apart this cheap ballpoint pen to use the ink.

And slid it into the center of the tubes. These photos are from the second pen I made. When I made the first one I had to experiment a bit with the length of the tubes so that inner purple tube didn't get caught on the ink after it was pulled out.
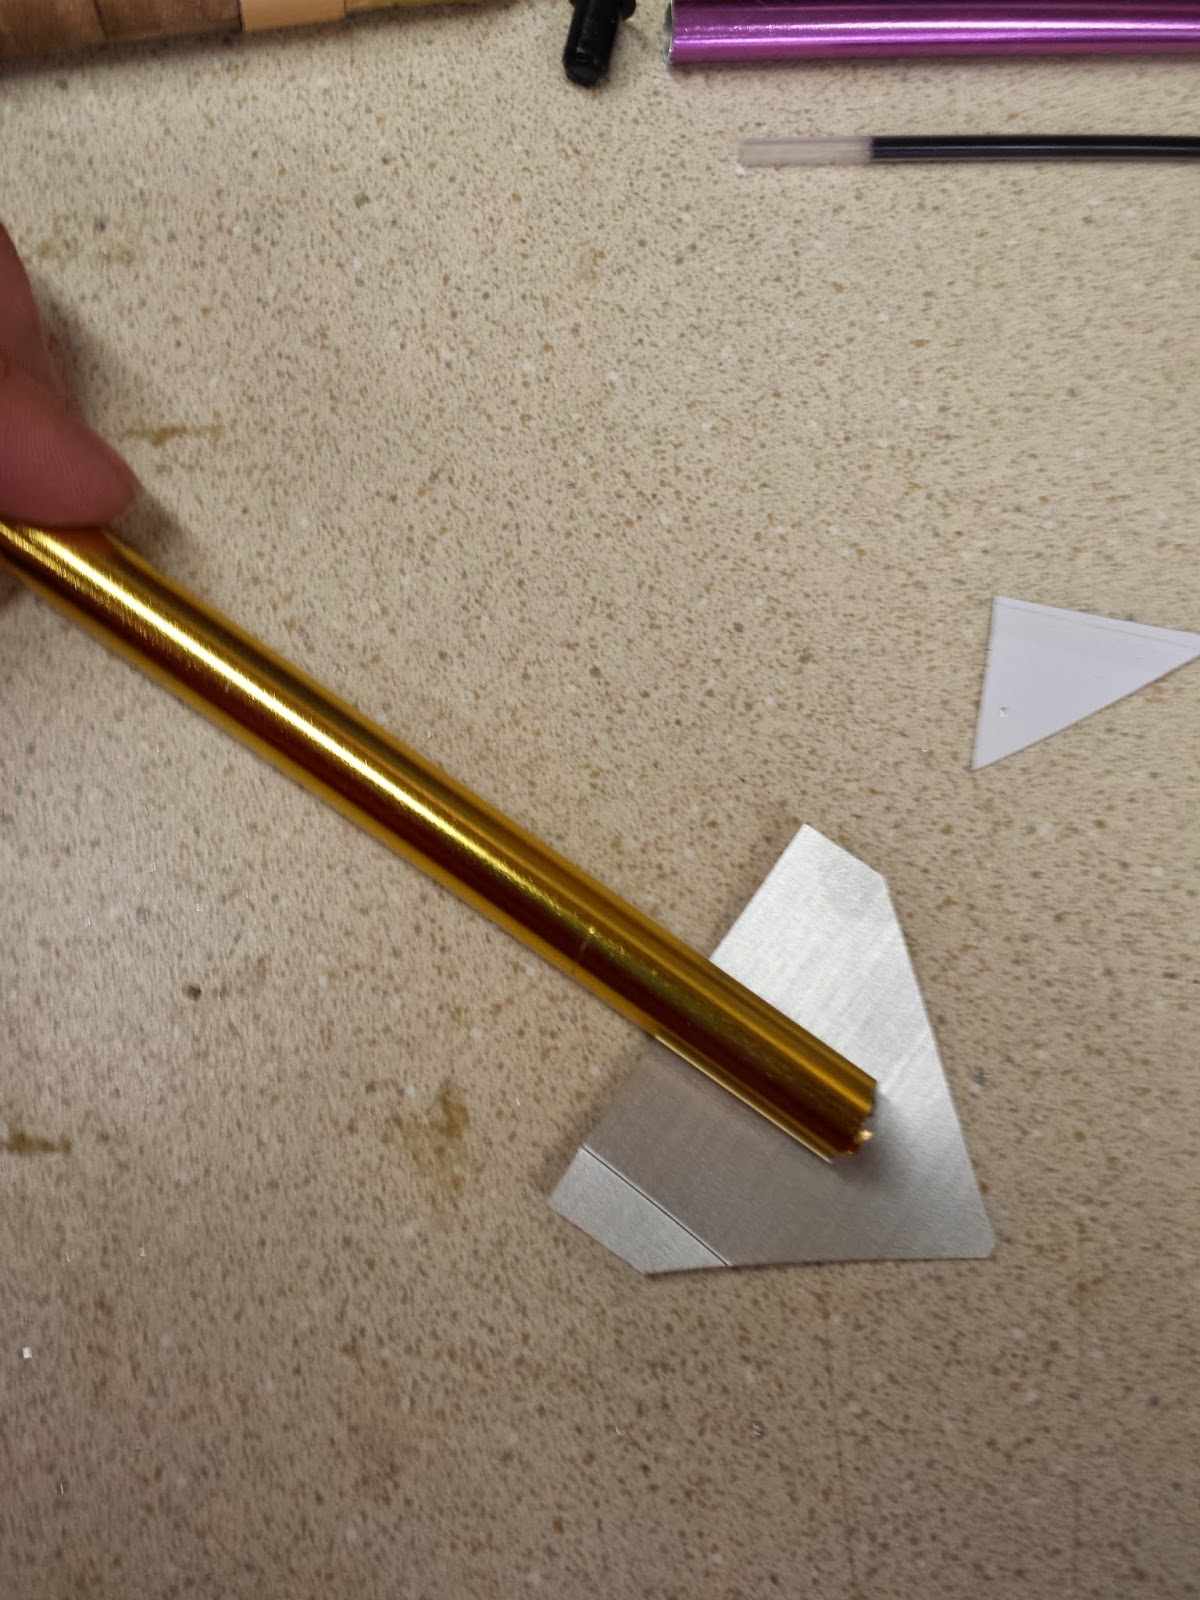

I simply wrapped the tape around the pen base to form a fairly convincing nib.

I then filled in the nib with hot glue, to make the nib more sturdy and to hold the ball-point ink in place.


Like so

Then used strips of the same gold contact paper to add these three stripes.


Here are the two finished pens, and below is the research image. Not very far off, and from a distance, rather convincing.
Saturday, August 9, 2014
Tea Sandwiches
For The Importance of Being Earnest at Oak Park Festival Theatre, I was lucky that these bread and butter sandwiches didn't need to be consumed, so I could save time and money by making fake ones.
I started with a scrap piece of upholstery foam I had left from a previous project.

I cut it into small rectangles, around 1 1/4" wide and 4" long

I then cut them in half width-wise by carefully wedging each piece between my scissors before cutting down.

I used some leftover liquid latex in between the two halves

The put the pieces back together for a nice little bread and butter tea sandwich.

Unfortunately I forgot to get a photo of all the tea sandwiches stacked daintily on the tray with the tea service, but trust me, it was lovely, and very convincing.
Civil War bag
For "Butler" at Peninsula Players Theatre, I needed a small bag stuffed with supplies for one of the actors. Usually, with a period play like this I would have to do a lot of research to get a good idea of what the bag may have looked like. Fortunately, with a Civil War play, a lot of the research has already been done and is easily accessible on sites used by Civil War reenactors. I was able to easily locate several images of white canvas "haversacks," and several sites that sold reproductions and even listed dimensions. I chose this one to base my bag on


I used a safety pin to slowly turn the strap inside out to hide the loose edges.

Then I pinned the front and back together, cut the angles on the two bottom corners and stitched around the outside.


As a side note, I was a little worried about breaking the needle on the sewing machine by trying to stitch through the thick leather of the belt. As I have done before in these situations, I still used the machine, but I turned the wheel by hand as opposed to using the electric pedal. It takes a little longer, but allows me to control the needle a bit more so it doesn't get forced through somewhere it doesn't want to go. I still get the nice, strong even stitches of the sewing machine,, but don't risk breaking a machine that was not intended for such industrial materials.


Here is a look at the finished closure.


Here is the strap nicely stitched in place.

Here is the finished bag.

And here is the finished bag loaded with supplies and ready to go into rehearsal.

Total, the project took about 2 hours and was a very satisfying productive break between some larger projects.
Wednesday, August 6, 2014
Thoughts on delegating
Most of the time in my props work, I am working solo. In the past year or so I've been able to have an assistant for tech week at times, but in general I research, shop, and create the props for a show entirely on my own.
Early this summer I had the opportunity to work several days as an overhire artisan at the Goodman Theatre. Working on a team with five full time props staff members and several other overhire workers was fun and very interesting. I learned a lot in a very short amount of time. With so many people around, there always seemed to be someone who was an expert in whatever task was at hand, and the shop turned out beautiful detailed work.
Right now, I am just finishing my first week at Peninsula Players Theatre. I have an assistant here who manages props all season, and an intern who has been assigned to props for this rotation (and has worked other jobs for the other productions this season). In this situation I'm the expert, and need to be in charge of the delegating, rather than being the one who is delegated to, as I was at the Goodman.
These two experiences have me thinking quite a bit about working as a team and the pros and cons of those experiences vs working solo. So, with my apologies for no organization strategy, here are some random thoughts on the subject.
-When I am the boss delegating, I find I can work very effectively by starting a project, teaching someone how to do it, and then leaving them to finish. Especially in my past experience as a tech director at a theatre where I had lots of unskilled intern labor, and very few skilled carpenters, I made it a personal rule to never finish a project. I would gather all the tools and supplies for a project, start laying it out, and create a sample if possible, so that when someone came wandering up asking "what should I do now" my answer was always, "this!" Since the project was already set up I didn't need to waste any time with long explanations and lists. The intern could get right to work and I could move on to the next project.
- The plus side of a large crew is that there is broader array of skills and expertise. If I encounter a problem with a project, I have five other people who can help me brainstorm and therefor will am more likely to find the best or most creative solution quickly. I often lament that my learning is limited while working as the only prop person on a show, because there is no one around to teach me, on a large crew there is always someone around who can teach you something, and I learned more in eight days at the Goodman than I probably did the entire rest of the summer.
- The down side to a big crew is that often, when things are busy, it is harder to learn a new skill. If I am a talented seamstress, and another crew member is a talented welder, there are rarely going to be occasions for me to improve my welding or her to improve her sewing. When those projects come up, it is most efficient to give the task to the person who has already perfected the skills to complete it. Artists end up growing much more specialized and less well rounded.
- You can delegate research. It's probably because most of the time when I have had an assistant it had been later in my process, but for some reason, before I was asked to do research at the Goodman, it hadn't occurred to me. I had the props intern do research for me on her first day of work and it was hugely helpful. It also helped to get her into the world of the show, which hopefully will continue to be a benefit no matter which projects I assign her going forward.
-The more people there are to delegate to, and supervise, the less you get to do yourself. This kind of goes along with the first point about never finishing a project, but I definitely get to a point where, after spending several days doing the shopping and the driving and the emailing I need to sit down and make something- even if it's something small.
-The more people there are to delegate to, and supervise, the less you get to do yourself. This kind of goes along with the first point about never finishing a project, but I definitely get to a point where, after spending several days doing the shopping and the driving and the emailing I need to sit down and make something- even if it's something small.
Sunday, April 20, 2014
Fake Quiche
For the upcoming production of Five Lesbians Eating a Quiche, I needed quiche (obviously), a LOT of it.
I started picking up pie plates at thrift stores as soon as I agreed to do the show. Within the show itself I needed about a dozen quiches, but the company also was very interested in having lots of quiche in the lobby as the audience is entering.
It was decided I would aim for 50 quiches, so I set to work.

I mixed up salt dough for the crusts. To save a bit of mess (as the flour tends to get everywhere) I mixed the dough in the sink.

Then I pressed the dough into the pie pans. For clear glass dishes I had to make a full crust, but for the metal or ceramic dishes I could get away with just doing the sides.

To bake the crusts I preheated the oven to 400 degrees, put in the pans, then turned off the oven and left the pies in there for the rest of the day. This didn't all happen in one day, by the way. I made crusts every morning for a few days, then cycled through the steps as each quiche was ready.

Once the crusts were baked, I filled them with great-stuff expanding foam.

After the foam hardened and cured, I carved off anything that had expanded above the top of the crust


I learned as I went that it works best to have an uneven surface on top, with all of the foam stopping about a quarter inch lower than the top of the crust.


My plan was to melt down wax, add yellow dye and pour it on top to finish the quiches. My first attempts didn't turn out as planed though. They looked too yellow, and the wax was too translucent. I ended up buying opaque taper candles from the dollar store to mix in with my bulk craft wax in order to get the opacity correct.

Wax can be tricky to judge because, when it melts, it is all transparent. It is hard to know what the color will look like once everything hardens and become whiter and more opaque.

After everything was melted down, I poured the wax over the great stuff, and then left it to cool.

Here are the same two quiches after the wax cooled.

The color is close to right, but the texture is all wrong.

Since the color was right I decided to start experimenting with fillings. I collected spare bits of past projects from my craft closet and set to work.

The first try was with these multi-colored pom-pom balls. I spread them over the foam,

Then poured the wax on top.

Once the wax cured, it looked like this. Better than the plain ones, but the texture was still not right, and it was too obvious what the pom-poms were.

I ended up spooning a bit more hot wax onto the top of the quiche. I then strategically pressed it, piled it and moved it with my spoon until it dried, leaving a much more convincing texture, and obscuring the obvious shape of the pom-poms.

I tried again with bits of red pipe cleaner


leftover fake leaves


and rice- not my favorite


And here are some of the results.

This is my first batch of 16, so I'm sure as I go forward they will get even better, and hopefully I'll find other filling options that give more interesting variety to the collection (I'm definitely want to try sprinkling the tops of some with real herbs while the wax is still hot).
Subscribe to:
Posts (Atom)


 Posts
Posts

