Showing posts with label foam. Show all posts

Monday, April 15, 2013

Potting fake plants

For Living Large in a Mini Kind of Way at 16th street theatre, we decided that in the last scene it be great for the two characters to be gardening while they talked. The director asked if I could provide supplies for the actors to fill three flower pots that could fit into the window box (which is filled with obviously fake flowers for the rest of the show).
 I started by purchasing the most natural looking small flowers I could find at Michaels. I found some pansies that looked right, and a stem of greenery that matched the leaves nicely. The pansies also made sense becuase they were one of the few fake flowers I could find that is actually sold in small flats of annuals at nurseries.
I cut small pieces of the flower stem and the greenery and pushed them into chunks of styrofoam.
Gethsemane nursery and garden center in Chicago was able to help me out by giving me some empty plastic containers that the annual flowers would come in, and a flat tray to hold them (they are my go-to location for anything having to do with plants or gardens in Chicago).
 I carved the foam away so that each piece fit nicely into the slots in the container.
 and then I painted them all with a coat of van dyke brown paint.
The result was very convincing and effective, and looked great as the actors placed them into real pots, and then used a small spade and their hands to fill in around them with real potting soil (which could be reused nightly).


Tuesday, November 15, 2011

Mantle Pieces

These mantle pieces were a quick project for Goodnight Moon.
To make them I used circles cut from 3/4" insulation foam and these glass bottles I found at American Science and Surplus (originally lava lamp bottles). 
I carved the foam to shape, attached everything together with Liquid Nails. 
Side note: make use when gluing foam that you use the Liquid Nails with the blue label. That is the one that is safe on foam. Other will eat through your foam, ruin you project, and produce some pretty toxic chemicals in the process
Finally I painted over all the foam with Elmer's glue to allow it to take paint, and spray painted them blue to match the clock on the fireplace. 

Wednesday, March 16, 2011

The Seedling Mile sign

When we were one week away from tech for Leaving Iowa, the director decided that one of the road signs we were planning on doing as a projection, would work better as a practical prop.
It needed to be light, easy to move, and look like this.

I kinda freaked out. I imagined hours and hours of careful stenciling to get all of that wording onto the sign, and I didn't have enough time left for that.
My brilliant production manager came to the rescue, however, and suggested foam craft letters. Perfect solution.

The base of the sign is just a sheet of pink insulation foam, screwed to a PVC stand and coated in a home made scenic dope (a mixture of latex paint, latex caulk and drywall mud).

I sorted the letters into piles to make it easier to form words (this was the most time consuming part) and hot glued the words from the research image onto my sign. I then used a foam brush to brush a copper paint over the letters. Since the letters were raised, very little of the paint got on the brown sign behind the letters and I only needed to touch up a few places.
As a quick solution for getting the smooth copper line around the border I painted strips of spike tape and stuck them to the sign.
From the front it looked really impressive, and thankfully that was how the audience saw it, because if you get a view from the side you can still see the edges of my multi-colored foam letters.

Friday, January 28, 2011

Foam Heads

So after the post about the successful foam fish, I bring you the story of the failed foam severed head.

Again I was working on a show with a tiny budget and a giant props list. I needed a severed head, and a plea to fellow props masters for a rental in the area turned up empty. One of the props masters mentioned though that he had made a severed head once with a cheap wig and a painted wig head.

I took a male wig head and added paper mache to make the neck look severed.

I painted him with a flesh tone (with a little green to make him look dead). I speckled him with blood and added a cheap wig from the bargain bin at a local costunme store.

Later I decided to cut the neck on a rougher line becuase it looked too long and clean.
I printed out the eyes and modge podged them in. The ink ended up running and the eyes looked a lot less realistic than I wanted. If I were to do it again I would spray them with some sort of spray fixative to set the colors before trying to glue them in.

The problem that I couldn't solve was the position of the mouth. The foam face was constructed with the jaw firmly set. A dead person does not have the muscle to hold their mouth the way that the wig head did.

When I asked the props master who gave me the idea he told me that the problem hadn't come up for him becuase his show had been heavily masked. The mask on his head hid the jawline.

I couldn't figure a way to change the existing jaw line without totally destroying the face.

In a last ditch attempt to distract from the mouth I added a fake moustache I bought at a costume store. It failed miserably and the head ended up getting cut.

If I had to do it again I think I might have to carve the whole head myself, or find someone with the expertise and supplies to do a good casting of a face.
Or just suck it up, cut money from somewhere else and invest in buying one (you can find them online through halloween stores year round).

Tuesday, January 25, 2011

Foam Fish

So first, some personal news, because I'm so excited I have to tell everyone that reads, I got engaged last Friday night. So keep an eye out, because in addition to props work and theatre crafts, you may be seeing some DIY wedding crafts on here in the future.
On to the fish!

For a production of New Electric Ballroom at A Red Orchid Theatre, I needed lots of large fish. On the small budget I knew I couldn't afford to cast them (I didn't have any leftover supplies from other projects and the right supplies can be expensive), so I started looking online for possible places to buy them. This also came up empty, as the fish I was finding were all too small and too expensive. To fill the two tubs I needed to fill I estimated I would need about 20 fish at that size.

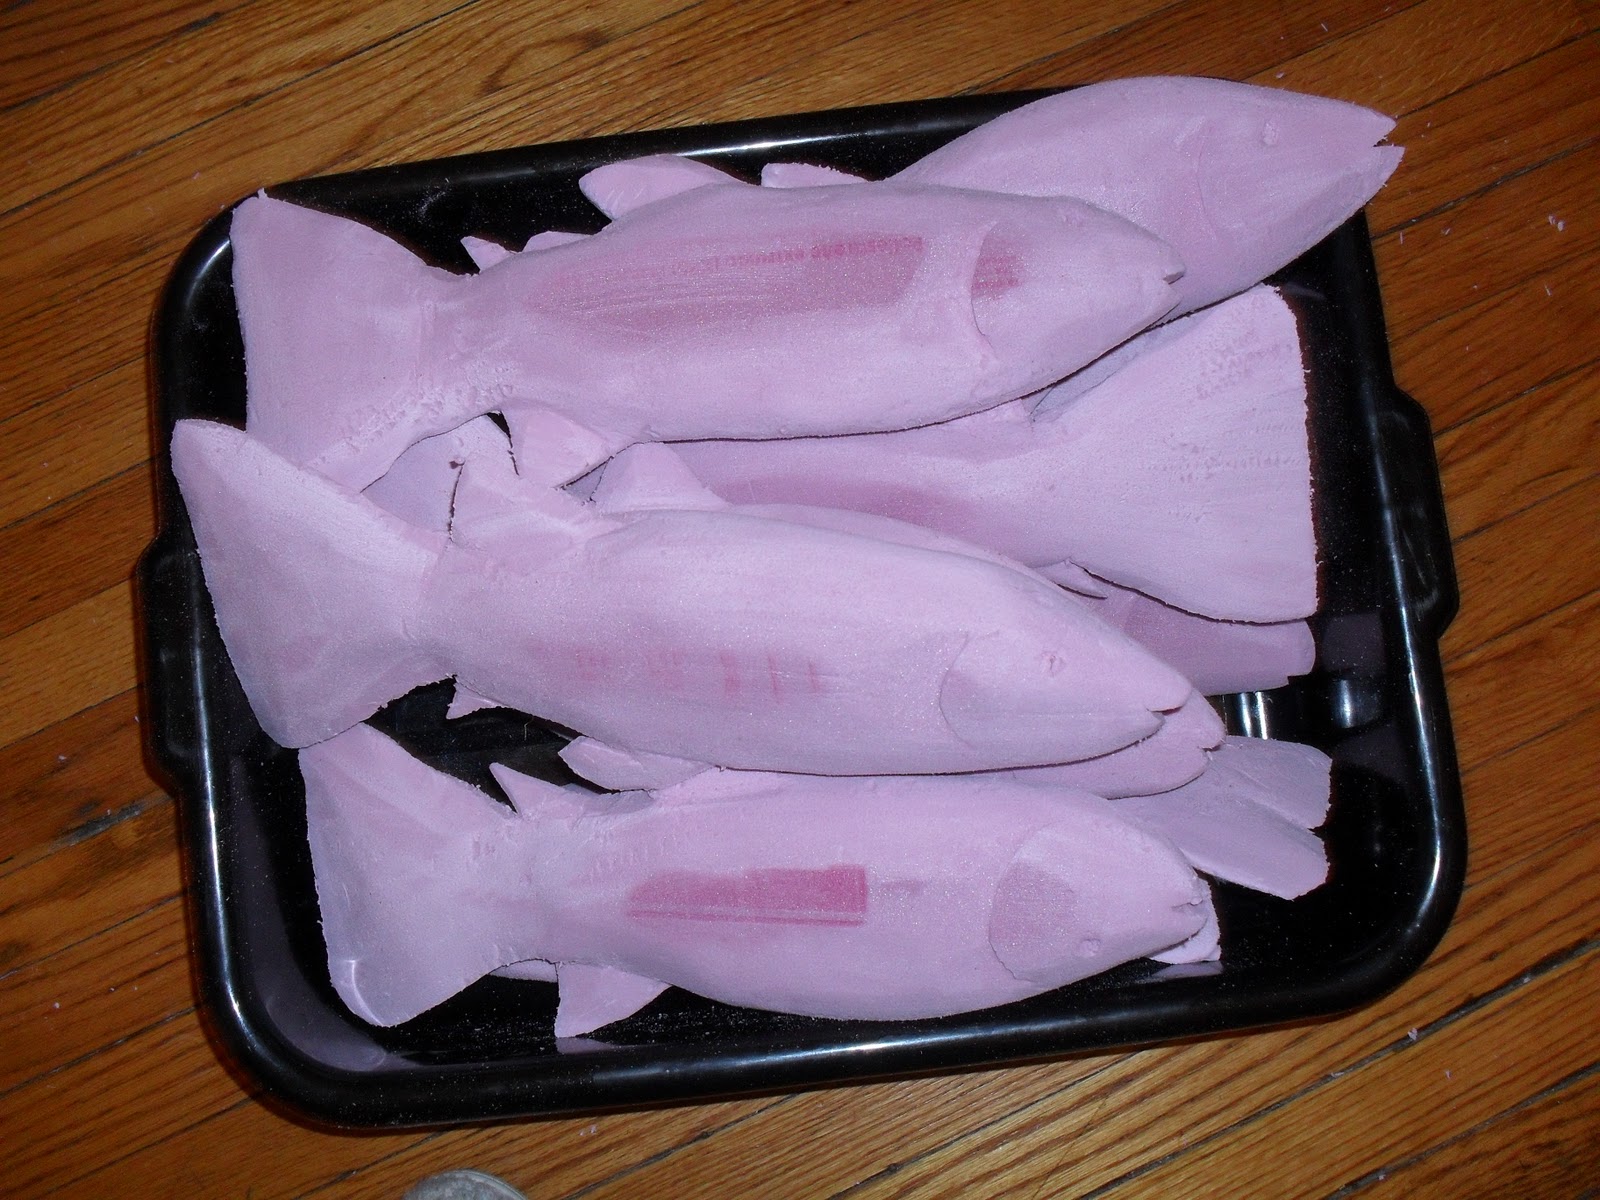
I finally came around to the idea of carving them. I started with 2" pink foam and traced a fish shape onto the front.
On a side note, one of my favorite tricks when cutting intricate shapes with a jig saw is to do it on a foam base as opposed to trying to prop your piece between makeshift sawhorses. The foam doesn't resist the blade or slow it down, but still supports your project as you cut. In this case I was using a foam base under the foam I was cutting, but I have used this same method for cutting lauan and plywood too.
After I had the basic foam shapes, I carved them down with a long razor (also known as an olfa knife or a snap blade knife)
 And then I sanded them to a smooth finish.
I painted each fish with three coats of liquid latex,
 And then painted them all with a silver base coat.
 
Then they all got a dusting of green, concentrating on the fins.
I inserted little black beads for eyes, and painted a little red behind the gills and in the mouth and they were done. 
Because I was able to make them as big as I wanted, I only needed ten fish, and the total cost of paint, latex, and foam was only around $50, less than half what I would have paid to buy the fish online.

Monday, November 1, 2010

cuckoo clocks

It's funny how the same props seem to show up in multiple shows at the same time. I just did two shows that had large amounts of sand onstage. I hadn't used old wooden crates in months and now I have three shows at once that need them. And now I needed two cuckoo clocks for two shows with the same director. 

The clocks are completely different of course. The first clock is for the Wizard of Oz. It is supposed to be balanced on the headboard of Dorothy's bed and then it falls and hits her to knock her out during the tornado. 
We of course couldn't use a real cuckoo clock, if we really knocked Dorothy out it would be a short show. The director asked if I could build a clock out of foam. 
I bought some foamies from the craft store and set to building. I used this as my research image.

I used 1/4" thick foam for the base frame of the house.

I used 1/8" foam for everything else (it comes in many more color options)
Everything was attached with hot glue.
And then I coated the entire piece with some watered down elmers glue, tinted with a little bit of brown paint.
And glue in a Styrofoam birdie to top it all off.

The second clock I needed was for It's a Wonderful Life- The Radio Play. I rented a clock from an antique store and the man there carefully wrapped the clock in layers of newspaper and bubble wrap. Unfortunaely neither he or I knew how a cuckoo clock should be packed and when I went to take the clock out I discovered that the chains had come off of the cogs on the inside of the clock and the stress of sitting on it's back had ripped the fragile paper of the bellows (the little paper accordion-type things that push the air through the whistles and makes the cuckoo sound)
I had the luckiest night ever though. I looked up clock repair on google maps. I found the phone number of a repairman about 5 miles away. I called and he told me to come right over. I got to his house at 6pm, he reattached the chains, replaced the bellows, and oiled and tightened everything. I picked the clock back up at 10 pm and he charged me the cost of parts and a pair of tickets to the show. 
The clock looks beautiful, and it sounds fantastic!


Sunday, August 15, 2010

Assembling an airplane

In the final scene of the Drowsy Chaperone a plane is supposed to fly onto the set, and then 10 people are supposed to fly away to Rio in it. Realism was not a requirement; the play sets itself up as classically theatrical. In past productions large scenic pieces have been flown in from above or brought in from the wings. Our challenge was to create the same effect at our theatre in the round.

The solution, from set designer Tom Ryan, was to build the plane as a set of small pieces that the actors would hold together to create the plane, almost like a giant puppet onstage.

The basic plan was that most of the pieces were to be carved out of foam. With the handles and hardware that was required though I had to have something to attach to, which meant I had to sandwich some type of wood between layers.
I used green contact cement to glue all of the foam pieces together and then carved and sanded them to round them out and give them dimension.

I made four of these clouds. They were created by cutting the two foam pieces and then tracing them onto either side of a piece of lauan that I cut to match the overlap. I screwed this piece of lauan to the dowel and then glued the foam back on either side (with a trench carved into one of the foam pieces to accomidate the dowel.

For the propeller I screwed a metal pipe phlange onto a piece of plywood and screwed that onto my large lauan circle. I glued the foam to the lauan with a hole cut for the plywood, and then another layer of foam on top to hide the plywood. The propeller itself had a lauan base with a dowel screwed to the back. The dowel passed through the phlange and the actor was able to spin it.
The actor wore the propeller like a shield with his arm passing through two canvas straps.
Each of the four wings was built from ripped down 1x2. Especially when using wood that was so thin it was important to predrill every screw and use glue on every joint. 
The large flat pieces were made of lauan again, sandwiched between pieces of 1/2 in foam. 

 
The tail fin was probably one of the trickiest pieces of the plane. each piece needed to attach to a belt, which meant that the lauan I used on the other pieces wouldn't be thick enough on end to screw into. I ended up carving out a groove to fit a piece of 1x4 between the two layers of foam. For the belt I found one that had grommets all the way around like this one so that I would have reinforced holes for the screws wherever I needed them (a lesson I learned, I still needed washers to further spread out the stress on the screw, on my first attempt the screws pulled the grommets through.) The side fins each had handles (with screws going into that hidden 1x4) so the actor could hold them out on the sides. The tail fin was stableized by running a thin line from one of those handles, through the top of the tail fin to the other handle.


The pieces came down all four aisles and before most of the audience realized what was happening the actors had assembled all of the pieces the create this fantastic spectacle.
Then to top it off the actors marched the entire thing in a giant pinwheel moving the wings and clouds up and down in time to the music.

I love theatre magic.