Showing posts with label Paulus. Show all posts

Saturday, February 15, 2014

Decapitated Head

I tried a version of this project 4 years ago, when I was just starting out doing props. It didn't turn out very well. 
The idea was to find a cheap and durable item to serve as a decapitated head. We didn't need a realistic face or hair, as the head would be wrapped in a bloody cloth. We just needed believable shape and weight. 
The first time, I started with a base of a hard rubber ball, then tried to sculpt the face around it. I think I ended up getting the shape close to right, but the weight was all wrong. The way the head moved and swayed in the hand of the actor revealed immediately that it was too light, and therefor clearly fake. 
This time, I again planned to use masking tape to do the sculpting, but instead of the rubber ball, I started with a 5lb bag of sugar as my base. In addition to the weight, it had the added benefit of already being larger and a more oblong head-shape, which saved me some work in building up bulk. 
I covered the bag of sugar with an initial layer of the masking tape, to make sure the sugar was sealed and prevent me from accidentally causing a tear in the bag while I was working on it. 
Sculpting with masking tape is done by creating long twisted strands. I tear of a long piece, stick the other end to a table, then proceed to twist the tape, sticky side out, in to a long rope. 
The ropes have far more bulk that just a single layer of tape would. I layer the tape ropes, first all over to round out the base shape, 
And then gradually in a more deliberate manner to sculpt the face. 
Until I have something that I think will be believable. 
Once the head is completely sculpted, it needs the final finish. 
A couple layers of masking tape stuck flat and face down creates a nice smooth skin.

I meant to finish this post with a photo of the head, wrapped in the bloody cloth, but I never managed to get a photo of it. I am pleased to say though that it was a success. Just before the head was brought onstage, the ASM dipped it into a bowl of watered down stage blood. It was gruesomely effective as the actor hoisted the head in the air and we could see the blood dripping down onto the stage.

To keep everything in good shape, the ASM wiped the head down nightly so none of the blood dried onto it, and the bloody cloth was put in with the laundry, to make sure it didn't get crusty. 


Saturday, November 30, 2013

knotted lamb and baby

For Paulus, at Silk Road Rising, the concept of the show was very theatrical. We felt specifically that two props, a dead baby, and a sacrificial lamb, would be far more effected if we abstracted them from the draped fabric world of the costumes, than if we were to try to create something totally realistic. 
Unfortunately I took far fewer photos of the process than I meant to, but the ones I have here should give a good basic idea of what we did. 
The first step in something like this is to create a skeleton. We wanted to props to be limp and floppy, but if they had been all fabric, the form would have easily been lost, and the effect wouldn't work. I looked up research images of lamb and human skeletons and cut dowel rods to match some basic skeletal structure. I glued the dowel rod to clothesline, with gaps at the joints to allow free movement at those places. 
Next the skeletons were wrapped in a base layer of fabric to hide out structure. I tied shorter knotted pieces at certain joints to prevent them from extending too far in unnatural directions (like tendons). 
Here you can see how a lamb leg is tied with tendons so it holds the shape of an actual lamb leg, with joints bending in the proper directions. 
Once the structure was in place, it became about tying and twisting many layers of fabric in order to fill out the bodies, and blend them with the world of the costumes. This is roughly what the final baby looked like. 
And here is the sacrifical lamb, lashed to a pole to be taken into the temple. The lamb was intended to be all white initially, but didn't look right. The addition of the strips of burlap added definition to the shape and had the added benefit of tying the lamb into the world of the set. 

Monday, November 25, 2013

Some things are worth paying more for: Percussion


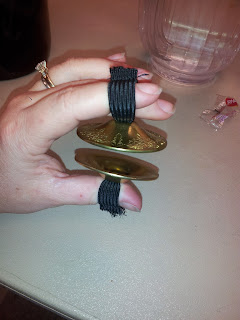
For Paulus at Silk Road Rising, the director had an idea to create a theatrical moment out of falling coins with actors in the wings using finger cymbols. He sent me an email suggesting it late in the rehearsal process and included a link to a novelty site where some could be purchased for $1.25 each. 
 I placed the order, and they showed up looking like this, and sounded exactly as bad as they should have for the price.
No matter how we tried, we couldn't get the cheap flat metal to make anything resembling the nice loud ring we were imagining. 

 After crunching some budget numbers I decided to give up the cheap cymbals as money gone and lesson learned. I purchased these real finger cymbals at a local music store. They were $20 for 2 pairs, 10x the amount of the cheap ones, but worth every penny in making an effective theatrical moment. 

Wednesday, November 20, 2013

Barbed Wire Crown

For Paulus at Silk Road Rising, we needed a barbed wire crown to put onto one of the actors. It was supposed to be very similar to the biblical crown of thorns. I first tried to make the crown out of twisted wire, with twisted and hand-cut barbs hot glued to it. I didn't like the outcome. I was able to glue the barbs in place so that they were all pointed away from the actors head, and to round the ends of them a bit, but they still seemed dangerous. If any of the barbs came loose from the glue, the actor was in danger of the barb twisting and scratching his head. 
The tech director on the show told me that he had seen barbed wire made before with rubber barbs. I found this website, which seems to make it their specialty http://www.actionprops.com/catalog/item/2278608/1717355.htm, but it was a bit expensive, and also a bit late in the process to be ordering something and waiting for shipping. 
I decided to try to make it myself. 
I found these rubber necklaces at Michael's. 
 I cut them into pieces about three inches long and then tied them onto the twisted wire crown I had created for a rehearsal prop. 
 The rubber allowed the actors to be safer when handling the prop, while I was able to make it look more dangerous. I cut the tips of each rubber barb at a steep angle to make them appear sharp, and was able to allow the barbs to point in all directions, instead of all needing to point deliberately out. 
A quick coat of silver paint resulted in a very convincing looking "crown of thorns". The only problem I have run into is that, since the rubber barbs can bend and flex, the silver paint slowly cracks and flakes off. It needs to be touched up once in a while, but that is something I can do quickly when I stop by the theatre. 

Friday, November 15, 2013

Wooden Axe

For Paulus at Silk Road Rising, we needed an ax for the final scene (a decapitation that is pretty awesome and very theatrical). Initially the ax was only going to be raised in the air, then we planned for lights to shift away from the executioner to someone holding the decapitated head (more on that in a future post). The look of the entire show is very utilitarian and "constructivist". I went to Menards and bought this basic ax.  
As rehearsals progressed, we realized that stopping at the top of the ax swing was not going to work, we needed the actor to complete his swing of the ax back down. This was all very theatrical, and blocked so that the actor being beheaded was in no danger. In order to protect our actors it was very important to have an ax which was lighter and easier to control. 

I remembered, several years ago, having a similar problem while working on the murder mystery weekends at Allenberry Playhouse. My master carpenter at the time used a large chunk of wood to cut and shape a wooden axe head to fit onto a pre-fab ax handle. I decided to try to recreate the project. 

First, I took mulitiple photos of the real axe in order to figure out the shape. 


Next I sketched out a basic shape onto a piece of 2x6. I cut the shape out with a jigsaw and began shaping it on the belt sander, slowly rounding out the back side, and narrowing the front to a "sharp" blade edge. I also used a set of chisels a few times to remove larger wood shavings and speed the process. 
Here is the mostly finished blade.
 One of the biggest challenges was cutting out the center hole in the blade in order to slide it onto the ax handle. I ended up taking large chunks out by drilling through with various sizes of drill bits, then taking out the bits in between with my chisels. 
 Replacement ax handles, like this one can be easily purchased at most hardware stores.
 I painted the ax with several coats of metallic black spray paint, sanding between each layer to smooth the finish. Then fitted the ax head onto the handle and added a touch of silver to the blade edge. 
Even from a few feet away, people were surprised to discover the ax wasn't real. 

Thanks to Naugy Peterson for coming up with this elegant and sturdy solution the first time.