Sunday, December 15, 2013

Never be afraid to ask...for WAY more than you can afford

An Inspector Calls at Remy Bumppo, turned out beautifully, with a huge beautiful oriental rug and beautifully finished wood furniture. 
When we started work on the show, and the set designer sent me research with images of the type of furniture he was imagining, I was worried. I knew my budget was not enough to be able to purchase anything. 
 Then, when I discovered that none of my go-to rental sources had anything, I was even more worried. 
 I hoped that I would find someone on craigslist selling something beat-up that I could repair, or something they didn't know the value of. But after weeks of looking I had nothing.
 While out running other errands in the city, I drove past an antique store that I hadn't been in for years. I had long ago ruled it out as being more expensive that I could afford on any of my budgets. I figured it couldn't hurt to stop in, and I was desperate. 
 Walking into the store I immediately knew I had to find a way to work with them. The furniture in the store was right out of the research images. 
 I approached the owner and told him the situation. I had $X to spend and knew that was far less than he should charge me for a rental of all the pieces I wanted. I could offer him comp tickets to see the show and an insert ad in the program (with a guesstimated value of $X, which would be seen by approximately X number of people). I would take responsibility for the safety of the items while they were in the theater's possession, and the show itself is fairly tame, no large fights, no one treating the furniture roughly etc.
 I was also able to provide him with a copy of the company's insurance policy, to assure him that, should some unforeseen incident harm his pieces, we would be able to compensate him. 
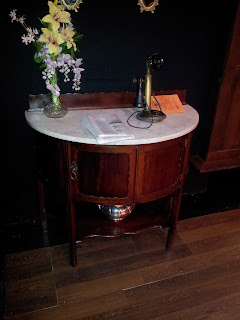
 He agreed to the rental and we have a beautiful dining room set with a table, six chairs, two beautiful gold mirrors, an overhead light fixture, and buffet and a marble top server for exactly what I had in the budget. 
 As precautions to preserve the condition of the furniture, we made sure to tell the cast and the set construction crew that it was rented and valuable, so that they take extra care with it. I have also given the ASM some nice furniture polish and rags. Every evening after the performance she wipes off and polishes the top of the dining table, to make sure no drops of liquid from the show are left on it, and to keep it in beautiful condition. 

Tuesday, December 10, 2013

Scraps of dessert

For An Inspector Calls at Remy Bumppo, the show opens at the end of a dinner party. The characters are supposed to be finishing last bites of dessert as the maid cleans the plates and dishes away. I made these quick plates of lemon cake and custard from upholstery foam and wax. 
 I tore very small bits of upholstery foam from a block I had, 
 I arranged the bits onto plates and then poured a bit of wax that I dyed to look like custard over each piece. 
In addition to creating a nice appearance of sauce, the wax served as the adhesive to attach the foam to the plates.
We purchased one small loaf of lemon cake at the grocery store. We will slice the cake and freeze it. Each week the stage manager will thaw a slice of cake and put one bite onto one of the plates so that one of our characters can have a real piece of cake on her fork to eat before the plates are taken away.

Thursday, December 5, 2013

Newspaper with inserted articles

Period newspaper props are getting more and more difficult passing year. As color ink gets cheaper and more common, it is harder and harder to find generic newspapers without large color photos or ads. At one point I could just remove the cover pages as interior pages rarely had color, then the color spread to those pages too. Just recently, my go-to generic newspaper, the Wall Street Journal started printing with color ads and photos on all the pages.
It is also difficult to print your own newspaper. You need a large format printer, and many print shops will refuse the hastle of printing onto newsprint, even if you bring the paper in yourself. It gets tangled and jammed in the printers easily because the paper is so thin.
For newspaper props that don't take a lot of wear and tear, this is my solution.
 I start with a small drawing pad of newsprint. I bought this one several years ago and it has lasted me through multiple projects.
 The pad is 9x12, so each sheet needs to be cut to 8.5 x11 to fit into my home printer.
 I pull images offline and type out a few headlines,
 Then glue the articles and headlines into my purchased newspaper to cover up the color photos.On this one I added the photo of the Titanic, the headline about war, and the small section of a period newspaper under the photo (to cover the larger photo on the page).
Since newsprint is so thin, the extra layer of print tends to blend seamlessly into the base paper and not cause too much stiffness. 
This is easier to do if you buy the paper you are going to be gluing into first, then you can measure the areas you are going to need to cover and format your images and text columns to fit. 

Saturday, November 30, 2013

knotted lamb and baby

For Paulus, at Silk Road Rising, the concept of the show was very theatrical. We felt specifically that two props, a dead baby, and a sacrificial lamb, would be far more effected if we abstracted them from the draped fabric world of the costumes, than if we were to try to create something totally realistic. 
Unfortunately I took far fewer photos of the process than I meant to, but the ones I have here should give a good basic idea of what we did. 
The first step in something like this is to create a skeleton. We wanted to props to be limp and floppy, but if they had been all fabric, the form would have easily been lost, and the effect wouldn't work. I looked up research images of lamb and human skeletons and cut dowel rods to match some basic skeletal structure. I glued the dowel rod to clothesline, with gaps at the joints to allow free movement at those places. 
Next the skeletons were wrapped in a base layer of fabric to hide out structure. I tied shorter knotted pieces at certain joints to prevent them from extending too far in unnatural directions (like tendons). 
Here you can see how a lamb leg is tied with tendons so it holds the shape of an actual lamb leg, with joints bending in the proper directions. 
Once the structure was in place, it became about tying and twisting many layers of fabric in order to fill out the bodies, and blend them with the world of the costumes. This is roughly what the final baby looked like. 
And here is the sacrifical lamb, lashed to a pole to be taken into the temple. The lamb was intended to be all white initially, but didn't look right. The addition of the strips of burlap added definition to the shape and had the added benefit of tying the lamb into the world of the set. 

Monday, November 25, 2013

Some things are worth paying more for: Percussion


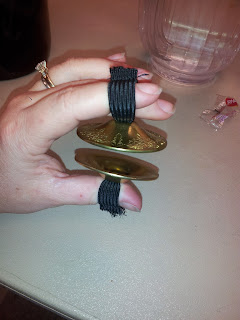
For Paulus at Silk Road Rising, the director had an idea to create a theatrical moment out of falling coins with actors in the wings using finger cymbols. He sent me an email suggesting it late in the rehearsal process and included a link to a novelty site where some could be purchased for $1.25 each. 
 I placed the order, and they showed up looking like this, and sounded exactly as bad as they should have for the price.
No matter how we tried, we couldn't get the cheap flat metal to make anything resembling the nice loud ring we were imagining. 

 After crunching some budget numbers I decided to give up the cheap cymbals as money gone and lesson learned. I purchased these real finger cymbals at a local music store. They were $20 for 2 pairs, 10x the amount of the cheap ones, but worth every penny in making an effective theatrical moment. 

Wednesday, November 20, 2013

Barbed Wire Crown

For Paulus at Silk Road Rising, we needed a barbed wire crown to put onto one of the actors. It was supposed to be very similar to the biblical crown of thorns. I first tried to make the crown out of twisted wire, with twisted and hand-cut barbs hot glued to it. I didn't like the outcome. I was able to glue the barbs in place so that they were all pointed away from the actors head, and to round the ends of them a bit, but they still seemed dangerous. If any of the barbs came loose from the glue, the actor was in danger of the barb twisting and scratching his head. 
The tech director on the show told me that he had seen barbed wire made before with rubber barbs. I found this website, which seems to make it their specialty http://www.actionprops.com/catalog/item/2278608/1717355.htm, but it was a bit expensive, and also a bit late in the process to be ordering something and waiting for shipping. 
I decided to try to make it myself. 
I found these rubber necklaces at Michael's. 
 I cut them into pieces about three inches long and then tied them onto the twisted wire crown I had created for a rehearsal prop. 
 The rubber allowed the actors to be safer when handling the prop, while I was able to make it look more dangerous. I cut the tips of each rubber barb at a steep angle to make them appear sharp, and was able to allow the barbs to point in all directions, instead of all needing to point deliberately out. 
A quick coat of silver paint resulted in a very convincing looking "crown of thorns". The only problem I have run into is that, since the rubber barbs can bend and flex, the silver paint slowly cracks and flakes off. It needs to be touched up once in a while, but that is something I can do quickly when I stop by the theatre. 

Monday, November 18, 2013

"Dream Candles"

I just bought one of these candles for Appropriate, at Victory Gardens and I'm blown away. Chicago has particularly strict regulations about open flame onstage, so strict that in most theatres the regulations boil down to "no open flame of any kind ever."

I've tried lots of fake flame candles and always been disappointed and usually need to find ways to obscure the audience's view of the effect in order to make the ugly fake flame less obvious. Once I opened the Dream Candle I ordered, I was tempted to ask the actors to turn it so that the flame was more present for the audience, it was just so believable and so cool.

The candles are made by a company called Luminara and are sold through a number of dealers. I bought mine online at frontgate.com.

The candles can be turned off and on using a switch on the bottom, or using a small wireless remote. Be aware the remote has very little range, and isn't terribly reliable from more than a few feet away.

My candle cost me just over $50, but for the amount of use that I am sure it will get in future productions, and the size of the problem it solved, it believe it was worth the investment.


Friday, November 15, 2013

Wooden Axe

For Paulus at Silk Road Rising, we needed an ax for the final scene (a decapitation that is pretty awesome and very theatrical). Initially the ax was only going to be raised in the air, then we planned for lights to shift away from the executioner to someone holding the decapitated head (more on that in a future post). The look of the entire show is very utilitarian and "constructivist". I went to Menards and bought this basic ax.  
As rehearsals progressed, we realized that stopping at the top of the ax swing was not going to work, we needed the actor to complete his swing of the ax back down. This was all very theatrical, and blocked so that the actor being beheaded was in no danger. In order to protect our actors it was very important to have an ax which was lighter and easier to control. 

I remembered, several years ago, having a similar problem while working on the murder mystery weekends at Allenberry Playhouse. My master carpenter at the time used a large chunk of wood to cut and shape a wooden axe head to fit onto a pre-fab ax handle. I decided to try to recreate the project. 

First, I took mulitiple photos of the real axe in order to figure out the shape. 


Next I sketched out a basic shape onto a piece of 2x6. I cut the shape out with a jigsaw and began shaping it on the belt sander, slowly rounding out the back side, and narrowing the front to a "sharp" blade edge. I also used a set of chisels a few times to remove larger wood shavings and speed the process. 
Here is the mostly finished blade.
 One of the biggest challenges was cutting out the center hole in the blade in order to slide it onto the ax handle. I ended up taking large chunks out by drilling through with various sizes of drill bits, then taking out the bits in between with my chisels. 
 Replacement ax handles, like this one can be easily purchased at most hardware stores.
 I painted the ax with several coats of metallic black spray paint, sanding between each layer to smooth the finish. Then fitted the ax head onto the handle and added a touch of silver to the blade edge. 
Even from a few feet away, people were surprised to discover the ax wasn't real. 

Thanks to Naugy Peterson for coming up with this elegant and sturdy solution the first time. 

Sunday, November 10, 2013

When should contracts be renegotiated

So this is more of a question than a statement, but I am starting to wonder when I should consider changes to the script and budget as motivations to insist on contract renegotiation.

Two recent conversations led me to this post.

The first was a conversation with a production manager who told me that one of her newest lessons came from a Tech Director (TD). He told her that if the budget of a show is increased, he always insists on an increase in pay. He logic was this; When he signs onto a project, he is agreeing on a certain amount of pay for a certain amount of work, namely as much scenery as can be built with the budget designated. Production managers and producers often decide, if a set estimate comes in over budget, to redistribute money, and increase the set budget in order to get the set desired. Unfortunately, this TD contends, that means more work for the TD, as more money means more scenery. This TD insists on renegotiating his contract if the budget has changed, because this means he is being asked to build more for the same pay.
This is something, in props, that I would never have considered. Often in my work, the more money I have, the easier my job becomes, because I can spend less time looking for the absolute best price possible.
The contract renegotiation that this TD spoke of seems very do-able, since in most cases the budget is listed in the contract. It is not hard to explain that a changed budget, changes the written terms of the contract. Having this in mind has convinced me to make sure all future contracts explicitly state my budget.

The second conversation I had is a bit trickier and also a more common problem.
A costume designer I regularly work with told me that she was frustrated with a current project. After she had signed her contract, the script was edited. In the new draft there was a huge prosthetic costume/makeup effect that had not been included in the first draft she had been given. She had taken a low paying show with the understanding that it was also an easy show. Now it wasn't an easy show. She felt bitter, stuck and taken advantage of. The conversation made me wonder if maybe I should think about asking for a clause in my contract that states that the pay and budget are based on the draft of the script that I had been given to review. I want the ability to reopen conversations about budget and fee if changes in future drafts significantly alter my workload.

These are just thoughts right now, but I would love to hear your thoughts and experiences. Do you have specific clauses you ask for in contracts? Have you even had to alter a contract based on changes to the script or to the design?

Tuesday, November 5, 2013

Green Tea Frappuccino

For Broken Fences at 16th Street, we needed three Starbucks Green Tea Frappuccinos. The director would have loved to have something real, but we agreed that the cost of something real, and the labor involved in prepping something for each performance would be too much.
We decided on a compromise. The drink itself would be fake, but we would add whipped cream on top that would be real, that way the cream could stick naturally to the straw, the actors could take the straws out and lick the whipped cream off them, and could make a very convincing slurping noise by sucking on the straw.
 To start this project, again I went with model magic. It air dries, so that it could be formed to fit the cup and dry in place, and it comes in nice pastel colors that would be perfect for the tea. 
 I pressed the model magic into the cup, trying to fill as much space as possible, leaving a hole through the middle for the straw. 

 The finished dried product looked fantastic, and looked even better with the whipped cream on top. 

In all of my experience with model magic I had always found that it stayed strong with a firm skin. that seemed easy to wipe clean. I had the assistant stage manager rinse the cups out nightly in order to keep them from getting sticky or disgusting. Unfortunately it turns out that either the cream or washing was slowly eating at the Model Magic, the stage manager emailed me concerned that the actors were drinking dissolved clay. She wondering what the clay was, if it was toxic and if something could be done to fix the situation.
To fix the situation, I ended up using wax. I melted down a small amount on my stove, poured the wax into the cup and then slowly poured it back out, letting it coat and seal all the model magic. 
 The wax is far less porous, should not absorb the cream and water in the same way, and should rinse clean very easily after each performance. 


Wednesday, October 30, 2013

Egg carton spiders

This project, for the children's show Click Clack Boo, at Lifeline theatre feels like it belongs on Pinterest more than on my blog. In this play the animals on the farm are planning a Halloween party. I was a little confused about how to proceed with the decorations for the party at the end, until I happened across this picture. 
Of course! Cow, Pig, Hen and Duck would use the supplies they had around the farm to make the decorations. 
I made a couple of these milk jug ghosts, made some paper chains, with jute rope twisted through them, and then had the idea for these spiders. 
 First I cut a 12 egg carton in half. 
 I left the center two egg spaces whole and cut the outer four into strips to make the legs. Scissors worked well on this Styrofoam egg carton, for the recycled paper ones I found that a sharp exact-o knife or box cutter was a better tool. 
 I painted my spiders black, 
and then added googly eyes, because everything is better with googly eyes.